Family holiday traditions are curious things. They are simultaneously fluid and static. For many, the failure to follow a tradition makes the holiday feel incomplete.
In my family, we don't have too many food-based traditions. Christmas dinner might be turkey, ham, goose, or venison with mashed white potatoes, mashed sweet potatoes, a vegetable, and a salad. Dessert is pumpkin pie with whipped cream (or Cool Whip if you can't do dairy). I'm not saying my family comes up short -- our biggest tradition is exchanging gifts in the light of the Christmas tree on Christmas Eve -- just that our traditions don't focus on food.
In my partner's family, there are a larger number of required foods for the holiday: boiled custard, cut-out cookies (like a sugar cookie, but smoother), turkey, and country ham. There is always country ham.
What food traditions do your families have around the winter holidays?
Monday, December 28, 2009
Monday, December 21, 2009
Wine and Food Pairing
A couple of weeks ago, I talked about going wine tasting. This week, I want to talk about pairing wines and food. After all, surrounded by so many great wines, how do I know what I should serve with a meal? I mean, white wine with white meat and red wine with red meat is so old-school. What do I serve with tuna? Does it matter if the tuna is sashimi (and therefore red) or grilled (and therefore white)? What if I'm not serving meat?
Let me start by saying, I'm not an expert. My use of wine terminology isn't necessarily what other people would use, but it's how I think about the wine and what its flavors are. It's also honest. I've come at pairing food and wine primarily from a cook's point of view -- the food is paramount. However, this isn't to say that I haven't built a meal around an interesting bottle of wine.
No matter how much you read about wines and pairing wines and food, there is no substitute for just getting out there and tasting the wines yourself. Everyone's palate is a little different; only you know what you like and why.
Pairing wine and food has two primary strategies: contrast and complement. In theory, these strategies are simple to apply. You either pair a wine and a food with contrasting qualities, such as pairing a sweet dessert wine with a bitter dark chocolate dessert, or with complementary qualities, such as pairing a Szechuan beef stir-fry with a spicy Barberi red wine. The reality of wine pairing is a little trickier.
In general, I tend to pair food and wine by which complements the flavor of the other. So, if I braise a chicken breast in a Chardonnay, I'm likely to serve a Chardonnay with it, sometimes from the same vintner, sometimes from another. For example, I brined two game hens in an oaked Chardonnay for Thanksgiving and served an unoaked Chardonnay with the meal. There was a risk that the Chardonnay in the brine would overwhelm what I served with dinner (due to the oakiness), but I expected the unoaked Chardonnay to help highlight the lightness and sweetness of the meat (which it did admirably).
However, you don't always cook with wine. Complementing the flavors of the wine and food is somewhat less obvious. I like to pair Merlot and Zinfandel wines with strongly spiced beef; I prefer Merlot when beef has heavier spicing (read: lots of spices, but not necessarily hot) and Zinfandel when I have a creamier/fattier sauce. However, when the food is spicy (read: hot), I really like to pair with a Syrah; the Syrah quenches the flames without washing away all the heat like a heavier red would. Sangiovese and Barberi are other varietals that are nice to pair with a spicy dish as the wine highlights the spicy flavor but controls the heat well.
Vegetarian dishes can pair well with red or white wines. In general, the preparation serves as a nice guide. Grilled or roasted vegetables tend to go better with Pinot Noir, Petit Syrah, or a Cabernet Franc, especially when spiced with basil or rosemary. When put in a tomato sauce, such as a ragout or a parmesian, I like Cabernet Sauvignon; the sharpness of the wine plays well with the tomato sauce. However, in cream sauces or cheese sauces, such as a broccoli rice casserole, whites generally work best. Which white works best depends on the effect I want. If the sauce is rich, I might pair it with a Chardonnay to highlight the voluptuousness of the sauce or pair it with a Pinot Gris to refresh the palate during the meal, allowing you to explore the intricacies of the cheese as you eat.
Cream sauces can be fun to pair with a meal. For a cream sauce built around mushrooms or beef, I like a nice red, usually a Pinot Noir or Petit Syrah. For a cream sauce with chicken, veal, or fish, Pinot Gris can be nice, unless the cream sauce is strongly flavored, such as a lemon beurre blanc. Then I would tend to go with a Chardonnay. Grilled chicken pairs wonderfully with a Chardonnay or a Sauvignon Blanc, but barbecued chicken is better with a Pinot Noir or a Petit Syrah.
Sushi is an interesting meal to pair a wine with. I tend to go with a white, not because sushi is fish, but because the flavors are a bit lighter overall (even unagi/eel). I like a Pinot Gris with sushi because it cleanses and refreshes the palate nicely. The lightness of the wine highlights the lightness and freshness of the fish.
Another interesting dish to pair a wine with is dessert. Most desserts are sweet, so pairing a sweet wine with it runs the risk of creating an cloyingly sweet end of a meal. I prefer to contrast my wine with dessert, serving a sweet Riesling, Gewurztraminer, or even an ice wine with a dark, bitter chocolate, for instance. Dry Rieslings work well with sweeter desserts. I'm still exploring dessert wines, mostly because I am not overly fond of sweet wines (unless I'm planning to mull it).
I haven't discussed blends here. The specific characteristics of a blend depends on which wines are used in the blend and the proportions of the wines. As a result, familiarity with a given vintner's blend is the best guide for pairing.
In the end, the best way to determine what wine to pair a food with is your own taste. You need to taste wines to learn their characters, both of the variety of wine and of the vintner. Like I said at the beginning, these are only my opinions at this time. As I explore new varietals, such as Lembergers and Vignoiers, I may change my opinions about best pairings.
Monday, December 14, 2009
Not quite the post I promised...
...but I want more time to work on the wine-food pairing entry. Besides, I got distracted by something else I found while wine tasting.
A company in the Tri-Cities area has a great little business going. They buy the grape seeds (separated by varietal) from wineries in the area. They then express the oil from the grape seeds. They leave some of the oil unflavored, but flavor some of the others. They then grind the expressed solids into a fine flour; I sampled the Merlot flour and it had a really nice nuttiness to it.
One of the flavors I bought was Chardonnay Fumé. It was created by fuming the Chardonnay grape seed oil with dried Chardonnay grape vines. The end result...Oh my!
Some of the different ways you can use these oils are:
Chardonnay Fumé Broiled Lamb
The lamb chops were amazingly tender and juicy. The Chardonnay grape enhanced the inherent sweetness of the lamb. The oil helped give the chops a really nice crusty sear and had a very mild smokiness to them.
The grape seed retains the flavor of the grape, so the lamb went really nicely with a locally-produced Chardonnay I had on hand.
I've never used grape seed oil before, but this will definitely be changing after the new year. I'm getting new ideas nearly every day, but haven't had the time try most of them.
Hopefully next week I'll have the wine pairing entry done.
A company in the Tri-Cities area has a great little business going. They buy the grape seeds (separated by varietal) from wineries in the area. They then express the oil from the grape seeds. They leave some of the oil unflavored, but flavor some of the others. They then grind the expressed solids into a fine flour; I sampled the Merlot flour and it had a really nice nuttiness to it.
One of the flavors I bought was Chardonnay Fumé. It was created by fuming the Chardonnay grape seed oil with dried Chardonnay grape vines. The end result...Oh my!
Some of the different ways you can use these oils are:
- Dipping oils for bread, crackers, etc.
- Vinaigrette
- Stir fry oils (I plan to use the five-spice for this)
- Broiling
Chardonnay Fumé Broiled Lamb
2 8 oz. lamb chops
1-2 tsp Chardonnay Fumé grape seed oil
1 tsp coarse Kosher salt
Preheat broiler. I prefer to use a cast iron skillet rather than a broiler because I get a better sear. I also have an electric oven so a skillet is really easy to use.
Trim excess fat from lamb chops and sprinkle salt evenly on both sides. Let sit for a few minutes.
Lightly oil both chops with the grape seed oil. Let sit for a few minutes.
Once the broiler is heated, place lamb chops on broiler or skillet. Sear for 2 minutes, then turn over and sear for one minute for a rare to medium rare (depending on thickness) lamb chop.
Let rest before serving.
The lamb chops were amazingly tender and juicy. The Chardonnay grape enhanced the inherent sweetness of the lamb. The oil helped give the chops a really nice crusty sear and had a very mild smokiness to them.
The grape seed retains the flavor of the grape, so the lamb went really nicely with a locally-produced Chardonnay I had on hand.
I've never used grape seed oil before, but this will definitely be changing after the new year. I'm getting new ideas nearly every day, but haven't had the time try most of them.
Hopefully next week I'll have the wine pairing entry done.
Monday, December 7, 2009
Wine Tasting
I didn't get much cooking done this week. I went wine tasting the weekend after Thanksgiving and had a blast. Unfortunately I also came home with a raging allergic reaction to something -- soap, we think -- on my hands, arms, and legs (the arms and legs are just an overreaction to the soap). However, it's taking a pretty serious steroid cream to bring it to bay, so I've not done much with food.
That's not to say I don't have anything to talk about. Remember, I was on a wine tasting trip; so I've got lots to talk about. I tasted at least 100 wines at 16 wineries in the Tri-Cities region of Washington over the course of two days. Don't worry, I wasn't driving, and generally didn't have more than a sip or two of any wine.
Washington state wines are coming out of obscurity and being recognized as the great wines they are. Washington vintners produce big, buxom Chardonnays; crisp, clean Pinot Noirs; well-balanced, lush Merlots; and subtly complex Syrahs. Do you want me to gush more? I didn't think so.
I noticed some interesting trends in wine production. Viogniers and Lembergers are the two hot new varietals that vintners are producing; at least one third of the wineries were sampling one or the other of them. Historically, these wines have been used predominantly for blending; now they are being recognized as varietals in their own right.
A Viognier is a quiet white wine. Its delicate fruitiness plays well along the tongue with just enough acidity and a touch of spiciness to keep it interesting. A Viognier has more body than a Pinot Gris or a Riesling, but is lighter than a Sauvignon Blanc.
A Lemberger, on the other hand, is a red wine. Elements of cherries and berries combine with a bright acidity to wake up the tongue. Lembergers are great wines when you want a wine that is reminiscent of a Merlot without the ponderousness that a Merlot can have.
Another interesting trend is Rieslings. Most of the Rieslings that Washington wineries have been producing are sweet, dessert Rieslings. Recently, several wineries in the area have been experimenting with dry Rieslings -- to great effect. A dry, crisp Riesling is quite refreshing, well-prepared to complement a cheese casserole (but I get ahead of myself -- that's next week's post).
Speaking of next week's post, it's getting late and I'm getting itchy (again). So I'm going to let you go so I can put cream on my poor itching epidermis. But before I go, next week's post is going to talk about pairing wines and foods -- just in time for the holidays!
Thursday, November 26, 2009
Roasted Cornish Game Hen
With only two of us at Thanksgiving, cooking a turkey, or even just a turkey breast, seems like a waste of food. However, Cornish game hens are just the right size. We generally only eat half of the chicken, so splitting one between the two of us is just right.
Wine-brined Cornish Game Hen
This was my first attempt to brine a bird. I declare it a success -- the meat was tender and juicy, slightly sweetened by the wine and enhanced by the ginger and garlic. I had expected a slightly heavier spicing, but this was nice as the spices highlighted the natural flavor of the meat instead of overpowering it.
Wine-brined Cornish Game Hen
2 Cornish Game Hens
375ml bottle of chardonnay
1/2 inch fresh ginger root peeled
5 cloves garlic
1/3 cup coarse kosher salt
~500 ml water
Peel both the ginger and garlic. Microplane both spices into a large non-reactive bowl or pan that is large enough to hold both game hens. I used a 5-quart stainless steel pan.
Add salt, wine, and 375 ml of water to pan. Heat while stirring until salt has dissolved and the scents of ginger and garlic begin to waft from the pan. Remove from heat and cool.
Wash game hens under running water, removing any giblets and excess fat on the flaps of skin at the body cavity. Once the brine is cooled, add the game hens. Add remaining water until game hens are covered. Refrigerate for 2-4 hours.
Preheat oven to 400°F (205°C). Remove game hens from brine and rinse. Pat dry. Place flat on roasting rack in roaster. Roast in oven until internal temperature of the game hen reaches 180°F (82°C) or until desired doneness. This will take approximately an hour to an hour and a half.
This was my first attempt to brine a bird. I declare it a success -- the meat was tender and juicy, slightly sweetened by the wine and enhanced by the ginger and garlic. I had expected a slightly heavier spicing, but this was nice as the spices highlighted the natural flavor of the meat instead of overpowering it.
Monday, November 23, 2009
Squash!
Fall brings with it squash. I love squash -- it's sweet and savory at the same time. And so much fun to cook! You can roast it, blanch it, fry it, etc.
It's also forgiving. You can add any spices you want to it and it generally turns out pretty good.
When roasting squash, you can roast it on its own, or take a little more time and stuff it. I prefer stuffing it. Some of my favorite stuffings include chicken/rice, wild rice/brown rice/wheat berries, and black beans/rice. Tonight's dinner was acorn squash stuffed with black beans and rice.
Acorn Squash Stuffed with Black Beans and Rice
The savoriness of the beans highlights the sweetness of the squash. This is a satisfying meal without meat, which is nice with Thanksgiving coming up this week.
It's also forgiving. You can add any spices you want to it and it generally turns out pretty good.
When roasting squash, you can roast it on its own, or take a little more time and stuff it. I prefer stuffing it. Some of my favorite stuffings include chicken/rice, wild rice/brown rice/wheat berries, and black beans/rice. Tonight's dinner was acorn squash stuffed with black beans and rice.
Acorn Squash Stuffed with Black Beans and Rice
1 large acorn squash
2 15oz. cans black beans
1 cup brown basmati rice
1/2 tablespoon coriander seeds
1 teaspoon ground cumin (or 1/2 tablespoon cumin seeds)
1 teaspoon tumeric
2 teaspoons salt
2 tablespoons butter
1/4 cup minced onion
3 cloves garlic, minced
2 cups water
Preheat oven to 400°F (205°C).
Put rice, water, and 1/2 teaspoon salt in saucepan and bring to a boil. Once boiling, turn to a simmer and simmer until done.
Cut squash into halves. Scoop out seeds and discard. Poke surface several times with a fork.
Melt half the butter. Baste the cut surface and cavity of the acorn squash. Sprinkle 1/4 teaspoon of the salt on each half. Place halves cut side up in roasting pan and place in oven.
Heat skillet and toast whole spices (do not use butter). Once the spices become aromatic, remove from skillet and grind in mortar and pestle. Melt butter in same skillet and saute onions and garlic until onion has turned translucent.
Once the rice is done, add beans (including fluids in can), onions, garlic, and spices. Continue heating until beans are heated through. The rice and beans should still be a bit soupy so the rice doesn't overly dry out in the oven.
Pull squash out of oven and fill cavities with beans and rice mixture. Return to oven (cut side up) and continue roasting until squash is done (soft through).
The savoriness of the beans highlights the sweetness of the squash. This is a satisfying meal without meat, which is nice with Thanksgiving coming up this week.
Monday, November 16, 2009
No new recipe tonight
I've been kind of dragging over the last few days; the weather has turned colder and I don't do well chilled. I will try to post a recipe later this week, but I can't make any promises.
Monday, November 9, 2009
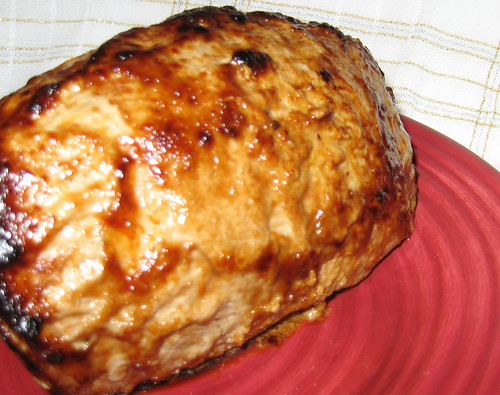
Cabernet Sauvignon Pork Tenderloin
This week's experiment involved pork and red wine. Washington state is really fortunate to have six hundred (yes, that's right, six hundred) wineries across the state, most of them east of the Cascades. So I get to sample some really excellent wines.
Columbia Crest puts out several lines of wine: Columbia Crest, Columbia Crest Grand Estates, Columbia Crest Reserve, Two Vines, and Horse Heaven Hills (3H). My favorite so far is the Two Vines wines; I haven't sampled the 3H wines yet. Wine Enthusiast, if I recall correctly, has stated that Two Vines have given several wines in the line 90+ points and says they are undervalued. I agree.
To get on with the experiment, I had gotten some lovely pork tenderloin last week at the grocery store (has a lovely butcher in house). Today I took off work after a weekend trip to rest and recover, but felt well enough to cook a nice dinner. While I was piddling around the kitchen, I had the inspiration to inject the pork with wine infused with cinnamon and clove. Yummy!
Cabernet Sauvignon Pork Tenderloin
The pork tenderloin turned out quite moist, tender, and flavorful. The cinnamon and clove did not overwhelm the inherent sweetness and flavor of the meat, but rather enhanced it. I served it cold as I didn't know when my partner would be home from work (meeting ran over).
Some observations:
Columbia Crest puts out several lines of wine: Columbia Crest, Columbia Crest Grand Estates, Columbia Crest Reserve, Two Vines, and Horse Heaven Hills (3H). My favorite so far is the Two Vines wines; I haven't sampled the 3H wines yet. Wine Enthusiast, if I recall correctly, has stated that Two Vines have given several wines in the line 90+ points and says they are undervalued. I agree.
Disclaimer: I am not being recompensed for my evaluation of this vineyard. I also may not be remembering the correct magazine; it may be Wine Spectator.
To get on with the experiment, I had gotten some lovely pork tenderloin last week at the grocery store (has a lovely butcher in house). Today I took off work after a weekend trip to rest and recover, but felt well enough to cook a nice dinner. While I was piddling around the kitchen, I had the inspiration to inject the pork with wine infused with cinnamon and clove. Yummy!
Cabernet Sauvignon Pork Tenderloin
1 pork tenderloin, about 1 pound
2 sticks cinnamon
8 or so cloves
1 to 2 cups of wine
1 teaspoon coarse kosher salt
1 tablespoon olive oil
Put the salt in a small, heatproof bowl. Add a few drops of wine to the salt and mix. Add wine until the salt begins to turn purple (do not dissolve salt). Set salt aside to dry.
Break up cinnamon sticks into smallish pieces. Place remaining wine, cloves, and cinnamon in small saucepan or saucier. Simmer, do not boil, for 15 minutes to half an hour. Let cool.
Strain the spices from the wine. Inject the wine into the pork tenderloin from each end. After injecting the first end, stand tenderloin on uninjected end and gently massage until wine is absorbed. Then inject the other end.
Coat bottom of baking dish with oil. Smear wine salt onto the top and sides of the tenderloin. Let rest for an hour or so.
Place the soaked cinnamon and clove in the baking dish. Bake at 350°F (175°C) until tenderloin reaches 170°F (77°C). Let rest for at least 15 minutes.
Slice thinly and serve either hot or cold.
The pork tenderloin turned out quite moist, tender, and flavorful. The cinnamon and clove did not overwhelm the inherent sweetness and flavor of the meat, but rather enhanced it. I served it cold as I didn't know when my partner would be home from work (meeting ran over).
Some observations:
- I could have used more cinnamon and clove without doing too much harm to the pork. I certainly would use more for beef.
- I need to work on my injecting technique. The meat had dark bands through it -- either I didn't use enough wine, didn't massage enough, or didn't let it sit long enough before cooking. This will require more experimentation
- I'm glad I didn't use a merlot or zinfandel with the pork. I think I would have overwhelmed the flavor of the meat. Next time I will consider using a lighter pinot noir just to see how well it would work.
Monday, November 2, 2009
More Shortbread Experiments
I continue to play with my shortbread. This last experiment was chocolate-flavoring.
Some time ago, I found a chocolate extract at a local grocery store. Chocolate extract isn't something many recipes call for, but I thought it might be interesting to substitute it for vanilla or mint in some recipes. I haven't done so (yet).
This week I was headed to a games night at a friends. We each provide a dish and I was planning shortbread. Well, another friend called for a ride and let me know she was planning to do shortbread cookies. Hmm, I needed something to make the shortbread rather different. Time to get out the chocolate extract!
Chocolate Shortbread Recipe
The extract messed with the fluid balance a little bit. I think next time I will add about a 1/4 cup more flour to help offset it.
I should have baked it a little longer - the chocolate made the dough a little more brown from the outset. I pulled it about three minutes or so before it was as done as I liked. However, the dough was cooked and set, just a little more moist than preferred. The chocolate flavoring came through subtly, yet distinctly.
Overall, this was a success, but one that needs fine-tuning.
Some time ago, I found a chocolate extract at a local grocery store. Chocolate extract isn't something many recipes call for, but I thought it might be interesting to substitute it for vanilla or mint in some recipes. I haven't done so (yet).
This week I was headed to a games night at a friends. We each provide a dish and I was planning shortbread. Well, another friend called for a ride and let me know she was planning to do shortbread cookies. Hmm, I needed something to make the shortbread rather different. Time to get out the chocolate extract!
Chocolate Shortbread Recipe
1 lb of unsalted butter
1-1/4 cup of confectioner’s sugar (or caster’s sugar) – do not use granulated
4 cups of flour
1/4 teaspoon of salt (optional – I often leave it out)
2 teaspoons chocolate extract
1/2 cup of chocolate chips
Cream together the sugar and butter until the butter is light and airy. Do not over-cream. Mix in the flour. I usually use a stand mixer, so I add it in ½ cup increments to keep my kitchen from being flour-coated.
Put in to 9-inch cake pans or a 13-inch baking dish. I used a 12" two-piece flan pan. Decorate the top with the chocolate chips - given the season, I decorated the top like a spiderweb. Bake at 325° for 25-30 minutes. The edges should just be beginning to turn brown.
The extract messed with the fluid balance a little bit. I think next time I will add about a 1/4 cup more flour to help offset it.
I should have baked it a little longer - the chocolate made the dough a little more brown from the outset. I pulled it about three minutes or so before it was as done as I liked. However, the dough was cooked and set, just a little more moist than preferred. The chocolate flavoring came through subtly, yet distinctly.
Overall, this was a success, but one that needs fine-tuning.
Monday, October 26, 2009
Cornish Game Hen
One of our local grocery chains (local to the area) every two weeks or so has a themed "13 Hour Sale." Some weeks the theme is baking supplies; others it is wine and cheese; and yet others it is candy. A little while ago, the chain had a 13-Hour Meat Sale.
For the most part, I buy meats as we plan to eat them. Not as economical as it might be, but the meat is fresh, not frozen. I didn't buy much meat this year as the sales weren't as good as they've been in the past, but I did pick up a few Cornish game hens for two dollars each. They were already frozen, so I didn't have to worry about reducing their quality by freezing them.
Not long after the sale, the weather turned colder. When the weather gets cold, I turn on my oven. So I roasted a Cornish game hen for dinner.
As most of you know, roasting meat is basically a balancing game of trying to get the internal temperature to a certain point before the meat dries out. The easiest way to do this is to roast at a relatively high temperature. The standard 350°F (176°C) oven that most people leave their ovens set at just doesn't cut it. The meat gets dry, especially for birds, while the bottom gets greasy. Not terribly appetizing.
The solution is simple: turn that oven UP! Roasting at anything less than 425°F (218°C) is not going to give great results, whether you are cooking a hunk of beef, a turkey, or a meatloaf.
I like to cook my poultry at about 450°F (232°C). The skin of the bird gets nice and crispy and the interior cooks faster than the moisture can evaporate. Yum!
Anyway, back to my Cornish game hen:
Cornish Game Hen
I can go either way regarding buttering the skin of the bird. If the bird is particularly thin-skinned, then it really does help keep the breast meat moist (as does roasting the bird on its breast, but then it doesn't look nearly as pretty). I am more likely to butter the skin if I melt the butter, simmer some herbs in it, then strain before applying to the bird. If you do butter the skin, it is more important to get the roasting temperature up so the skin crisps nicely.
If you don't want an herb-y chicken, use zest from and orange or lemon, apple, peach, or nectarine.
The stuffing in the cavity of the bird perfumes the meat wonderfully and leaves no bitterness behind.
For the most part, I buy meats as we plan to eat them. Not as economical as it might be, but the meat is fresh, not frozen. I didn't buy much meat this year as the sales weren't as good as they've been in the past, but I did pick up a few Cornish game hens for two dollars each. They were already frozen, so I didn't have to worry about reducing their quality by freezing them.
Not long after the sale, the weather turned colder. When the weather gets cold, I turn on my oven. So I roasted a Cornish game hen for dinner.
As most of you know, roasting meat is basically a balancing game of trying to get the internal temperature to a certain point before the meat dries out. The easiest way to do this is to roast at a relatively high temperature. The standard 350°F (176°C) oven that most people leave their ovens set at just doesn't cut it. The meat gets dry, especially for birds, while the bottom gets greasy. Not terribly appetizing.
The solution is simple: turn that oven UP! Roasting at anything less than 425°F (218°C) is not going to give great results, whether you are cooking a hunk of beef, a turkey, or a meatloaf.
I like to cook my poultry at about 450°F (232°C). The skin of the bird gets nice and crispy and the interior cooks faster than the moisture can evaporate. Yum!
Anyway, back to my Cornish game hen:
Cornish Game Hen
1 Cornish game hen
1/4 large onion, chopped coarsely
2 tablespoons garlic, chopped finely
1 teaspoon of one of the following fresh green herbs chopped finely: sage, rosemary, thyme, tarragon (2 teaspoons of the dried version will work)
1-1/2 teaspoons salt
2 tablespoons butter
Preheat the oven to 450°F (232°C).
Melt the butter.
Clean the interior of the cavity of the bird, removing any giblet packets and any stringy material. Spread the salt along the interior of the cavity. Put the chopped onion, garlic and green herb. Place Cornish game hen on its back in a roasting pan.
Drizzle butter over the skin of the bird.
Roast until the internal temperature reaches 180°F (82°C). Let rest for 10 minutes, remove the stuffing (discard the stuffing), then serve.
Serves 2
I can go either way regarding buttering the skin of the bird. If the bird is particularly thin-skinned, then it really does help keep the breast meat moist (as does roasting the bird on its breast, but then it doesn't look nearly as pretty). I am more likely to butter the skin if I melt the butter, simmer some herbs in it, then strain before applying to the bird. If you do butter the skin, it is more important to get the roasting temperature up so the skin crisps nicely.
If you don't want an herb-y chicken, use zest from and orange or lemon, apple, peach, or nectarine.
The stuffing in the cavity of the bird perfumes the meat wonderfully and leaves no bitterness behind.
Monday, October 19, 2009
Mushrooms and Leeks
I like mushrooms and I like leeks. So the recipe Fungys in Forme of Cury that combines the two is especially appealing. Especially since it contains my favorite spice blend of all time: poudre forte (strong powder). Since I don't rely on a set poudre forte recipe, that meant I could play!
I will warn you up front that the measurements of the spices is only general as I blended these by smell not by measurement. I was looking for a spicing that would help bring out the piquancy of the leeks and support the savoriness of the mushrooms. Also, this recipe can be made up with more or less cooking broth, depending on if you want something like a soup or something more like a side dish.
Mushrooms and Leeks
I liked how the ginger and the garlic helped enhance the sharpness of the leeks and brightened the dish. The cinnamon, cumin, coriander, mace, and nutmeg balanced the sharpness and supported the meatiness of the mushrooms.
This dish is a wonderful low-fat dish. If you used vegetable broth (preferably not tomato-based) to make a vegetarian version, few carnivores would miss the lack of meat. I made three quarts of this for potluck of 150 people and it was gone by the time 3/4 of the people had gotten through the line!
Serve with bread for a satisfying soup.
I will warn you up front that the measurements of the spices is only general as I blended these by smell not by measurement. I was looking for a spicing that would help bring out the piquancy of the leeks and support the savoriness of the mushrooms. Also, this recipe can be made up with more or less cooking broth, depending on if you want something like a soup or something more like a side dish.
Mushrooms and Leeks
1 lb crimini mushrooms (portabellos will work too)
1 lb leeks
1 tablespoon (more or less) ginger powder
1/2 tablespoon (more or less) garlic powder
1 teaspoon (more or less) cinnamon powder
1/2 teaspoon (more or less) coriander powder
1/2 teaspoon (more or less) nutmeg powder
1/4 teaspoon (more or less) mace powder
1/4 teaspoon (more or less) cumin powder
1/2 teaspoon (more or less) black pepper
1 teaspoon (more or less) salt
1-2 cups (more or less) chicken broth
Thinly slice the leeks across the grain into coins, between 1/16 and 1/8 of an inch thick. Hint: Slice the leeks then clean them to get the most grit/sand out of them. As you reach the dark green of the outer leaves, remove them and continue slicing the lighter/brighter green of the inner leaves.
Thickly slice the mushrooms, between 1/8 and 1/4 of an inch.
Place leeks and mushrooms in a pan with spices and add broth. If the dish is a side dish, fill with broth to about 2/3 the height of the mushrooms and leeks (you will bet more fluid from the mushrooms as they cook); if the dish will be a soup, make sure the mushrooms and leeks are completely covered with fluid.
Simmer until the mushrooms and leeks are cooked. You want them to cook for the same length of time to allow the flavors to marry and for the mushrooms to become the dominant flavor in the broth.
I liked how the ginger and the garlic helped enhance the sharpness of the leeks and brightened the dish. The cinnamon, cumin, coriander, mace, and nutmeg balanced the sharpness and supported the meatiness of the mushrooms.
This dish is a wonderful low-fat dish. If you used vegetable broth (preferably not tomato-based) to make a vegetarian version, few carnivores would miss the lack of meat. I made three quarts of this for potluck of 150 people and it was gone by the time 3/4 of the people had gotten through the line!
Serve with bread for a satisfying soup.
Monday, October 12, 2009
Ribs, succulent ribs!
One of my local grocers frequently has pork ribs on sale: spare ribs, baby back ribs, or country ribs. So I've become quite fond of trying to barbecue them.
I don't mean drenching them in sauce and grilling them at a high heat until they are done and dry. I mean long, slow cooking at relatively low temperatures for hours until they are tender and juicy and just everything ribs should be.
Most grills produce temperatures that are too high to do this, even at the lowest settings that still produce flame. But my oven at home works beautifully -- I can set it as low as 170°F (77°C) if I want. I can cook as low and slow as I want. If I remember to give the meat enough time to cook.
Pork Ribs
I cook the ribs for at least a half hour after I've put the last of the sauce on so the newest basting has time to thicken.
I will admit that I cheat using the commercial barbecue sauce as a base for my sauce. Mostly that's because I don't want to be chained to the stove cooking down the sauce for myself. I want to be able to focus on doing other things: sewing, painting, writing this blog...
The results of this slow roasting are wonderful. The sauce is nice and thick and not overly messy. It is also incredibly rich with a wonderful balance of tangy, sweet, and spicy. I don't like overly tomato-y barbecue sauces; I only want to use it as a jumping off point for my other flavors. Thinning the barbecue sauce with the soy sauce and Worchestershire sauce (and the whiskey) adds more savoriness to the sauce while the garlic, ginger, and cayenne tantalize the nose and tongue.
I don't mean drenching them in sauce and grilling them at a high heat until they are done and dry. I mean long, slow cooking at relatively low temperatures for hours until they are tender and juicy and just everything ribs should be.
Most grills produce temperatures that are too high to do this, even at the lowest settings that still produce flame. But my oven at home works beautifully -- I can set it as low as 170°F (77°C) if I want. I can cook as low and slow as I want. If I remember to give the meat enough time to cook.
Pork Ribs
1 rack of pork spare ribs
1 tablespoon salt
Dry Rub
3 tablespoons powdered garlic
1 teaspoon freshly ground pepper
1 teaspoon ground cinnamon
1 teaspoon ground ginger
1-1/2 teaspoons ground mustard
1 tablespoon ground cumin
1 teaspoon ground coriander
1/2 teaspoon ground tumeric
1 teaspoon smoked paprika
1/2 teaspoon cayenne pepper
Sauce
1 cup barbeque sauce -- I use Jim Bean No 7
1/4 cup soy sauce
1/4 cup Worchestershire sauce
1 teaspoon lemon juice
2 teaspoons tomato paste
1 cup of water (1/2 cup of whiskey can be substituted for 1/2 cup of the water)
Rub the spare ribs with the salt on both sides. Let sit while you mix the dry rub. Once the dry rub is done, rub both sides of the ribs with 1/2 of the dry rub mixture. Cover loosely with plastic wrap and let sit in the refrigerator for at least two hours.
Heat the oven to 250°F (121°C). You can set the oven as low as 200°F but it will take much, much longer to cook. Remove the plastic wrap from the ribs and place in the oven on a baking sheet. You may want to set the ribs on a rack on the baking sheet to let the meat drain more effectively.
Flip over every two hours.
Mix the ingredients for the sauce with the remaining dry rub. After the ribs have been flipped for the second time, spoon about 1/4 of the sauce over the top of the ribs. Each time the ribs are flipped, spoon about 1/4 of the sauce over the new top surface.
Continue cooking until done, between 7 and 8 hours.
I cook the ribs for at least a half hour after I've put the last of the sauce on so the newest basting has time to thicken.
I will admit that I cheat using the commercial barbecue sauce as a base for my sauce. Mostly that's because I don't want to be chained to the stove cooking down the sauce for myself. I want to be able to focus on doing other things: sewing, painting, writing this blog...
The results of this slow roasting are wonderful. The sauce is nice and thick and not overly messy. It is also incredibly rich with a wonderful balance of tangy, sweet, and spicy. I don't like overly tomato-y barbecue sauces; I only want to use it as a jumping off point for my other flavors. Thinning the barbecue sauce with the soy sauce and Worchestershire sauce (and the whiskey) adds more savoriness to the sauce while the garlic, ginger, and cayenne tantalize the nose and tongue.
Monday, October 5, 2009
Stuffing
With Thanksgiving coming up, I thought that talking about stuffings for poultry would be a nice idea. See, I'm not overly into bread stuffings. I like stuffing to help flavor my birds.
Last week, I stuffed a duck with rosemary and nectarine. The fruit helped keep the duck moist and perfumed the meat with rosemary.
I've also roasted chickens stuffed with onion, rosemary, sage, and tarragon. Other stuffings I've used are:
The keys to using this type of stuffing are to pack the cavity loosely and to not try to fill the cavity. Some air flow within the bird is desirable and helps with the perfuming of the meat. Fruits help the meat stay moist and the acids help cut the fat (especially for game birds like ducks and geese).
Make sure you take the temperature of the stuffing as well as the bird to ensure it is done. Rest the bird, then remove the stuffing; generally, you won't want to eat it.
This Thanksgiving, have fun with non-traditional stuffing. They can really add flavor to your bird without adding the calories (and carbs) of a traditional stuffing.
Last week, I stuffed a duck with rosemary and nectarine. The fruit helped keep the duck moist and perfumed the meat with rosemary.
I've also roasted chickens stuffed with onion, rosemary, sage, and tarragon. Other stuffings I've used are:
- Parsley and onion
- Leeks
- Onions, mushrooms, sage
- Whole sprigs of rosemary, sage, and thyme
- Apples, cinnamon, and nutmeg
- Apricots, and sage
- Grapes, currants, and rosemary
The keys to using this type of stuffing are to pack the cavity loosely and to not try to fill the cavity. Some air flow within the bird is desirable and helps with the perfuming of the meat. Fruits help the meat stay moist and the acids help cut the fat (especially for game birds like ducks and geese).
Make sure you take the temperature of the stuffing as well as the bird to ensure it is done. Rest the bird, then remove the stuffing; generally, you won't want to eat it.
This Thanksgiving, have fun with non-traditional stuffing. They can really add flavor to your bird without adding the calories (and carbs) of a traditional stuffing.
Monday, September 28, 2009
Duck, Duck, Nom
I love cooking game meats. I grew up in a hunting family where what we brought in was a significant portion of the meat we ate: venison, goose, squirrel, rabbit, grouse, and duck. Now that I no longer live with my parents and no longer hunt (due to living in a city and not tolerating cold at all), I don't get game nearly as often. But, if I'm willing to pay a bit of cash, I can often get farm-raised game in a local grocery.
This week, I had offered to provide a meat entreé for a dinner party hosted by a friend. I wanted to make a special dish that people would remember and that they couldn't get very often, so I chose to roast a duck with rosemary and nectarines.
Duck with Rosemary and Nectarine
The duck can be served hot or cold.
I served the duck cold as I made it the day before the party. The duck remained moist and flavorful, perfumed with the rosemary. The gaminess of the duck was offset by the nectarine, though apricots, apples, or peaches will work as well.
The duck meat was very, very moist and tender. In fact, the carving the duck was an adventure as it wanted to fall away from the bone.
This week, I had offered to provide a meat entreé for a dinner party hosted by a friend. I wanted to make a special dish that people would remember and that they couldn't get very often, so I chose to roast a duck with rosemary and nectarines.
Duck with Rosemary and Nectarine
1 2-3 pound ducking, skin on (if the duck comes skinless, lay strips of bacon along the breast to keep it from drying out)
1 nectarine
2-3 stalks rosemary
1/2 - 1 teaspoon salt
2 tablespoons butter, melted
Preheat oven to 350°F (175°C).
Chop the rosemary finely.WARNING: Do not chop fingers while chopping rosemary. If finger is chopped while chopping rosemary, seek medical attention if necessary. Once finger is appropriately treated and bandaged, discard rosemary and start with fresh rosemary, knife, and cutting board. Or avoid potential of above by using food processor ;)
Peel nectarine and remove pit. Slice or chop nectarine into large pieces.
Unwrap duck and remove any giblets, neck, or other material remaining in body cavity. Rinse out with cold water and drain briefly.
Spread salt throughout the cavity of the duck and rub gently. Insert rosemary and nectarine into cavity.
Spread a little of the butter in a roasting dish and place bird in dish. Rub remaining butter on the skin of the bird (if bird is skinless, skip this and lay bacon on bird instead).
Place duck in oven and cook until internal temperature has reached 170°F (77°C). Remove duck (remove bacon now) and let rest.
The duck can be served hot or cold.
I served the duck cold as I made it the day before the party. The duck remained moist and flavorful, perfumed with the rosemary. The gaminess of the duck was offset by the nectarine, though apricots, apples, or peaches will work as well.
The duck meat was very, very moist and tender. In fact, the carving the duck was an adventure as it wanted to fall away from the bone.
Monday, September 21, 2009
Roast Beef in a Garlic Smear
I love to roast meats and veggies, especially as the weather grows cooler. Not that the weather is actually cool yet, but the temperatures have gone down enough from summer that I feel like I can turn the oven on again.
The local grocery chain had eye of round roasts on sale. The interior doesn't have a lot of fat, so the trick is to keep the roast from drying out. I opted for a relatively quick cooking time and a coated exterior to keep the juices in.
The coating didn't really form a crust and it wasn't a glaze, so I wasn't sure what to call it. I decided to settle on a smear.
Roast Beef in a Garlic Smear
As garlic is roasted, it loses a lot of its pungency and increases its umami and sweet tones. The oil kept the smear from getting crusty, but also helped hold in the juiciness of the meat. My favorite part of the roast was the edges next to the carmelized crust. This would be a surprise to anyone who knows me because I tend to prefer my beef on the blue end of rare -- which was not how this edges of this roast were. But the meat was so sweet and succulent that I almost couldn't get enough of it.
I served the roast with baked mashed potatoes with horseradish and steamed broccoli.
The local grocery chain had eye of round roasts on sale. The interior doesn't have a lot of fat, so the trick is to keep the roast from drying out. I opted for a relatively quick cooking time and a coated exterior to keep the juices in.
The coating didn't really form a crust and it wasn't a glaze, so I wasn't sure what to call it. I decided to settle on a smear.
Roast Beef in a Garlic Smear
1/3 cup olive oil
3 tablespoons chopped garlic
1 - 2 teaspoons balsamic vinegar
1/2 teaspoon salt
2 - 2-1/2 lb beef roast
Puree the olive oil, garlic, vinegar, and salt together.
Trim any excess fat from the outer layer of the meat.
Spread a couple of teaspoons of olive oil on the bottom of the roasting pan. This will keep the roast and smear from sticking to the pan.
Coat the roast with the puree and place in roasting pan. Roast at 450°F (232°C) until the internal temperature reaches the desired level of doneness. I cooked mine until 140°F (60°C), which took about two hours or so.
As garlic is roasted, it loses a lot of its pungency and increases its umami and sweet tones. The oil kept the smear from getting crusty, but also helped hold in the juiciness of the meat. My favorite part of the roast was the edges next to the carmelized crust. This would be a surprise to anyone who knows me because I tend to prefer my beef on the blue end of rare -- which was not how this edges of this roast were. But the meat was so sweet and succulent that I almost couldn't get enough of it.
I served the roast with baked mashed potatoes with horseradish and steamed broccoli.
Monday, September 14, 2009
Citrus Balsamic Vinaigrette
Last week, I made an interesting sauce for over steamed broccoli and carrots. The sauce was simple: balsamic vinegar and orange zest. All weekend long, all I could think of was how good that sauce was and how awesome it would be over fresh greens and some fruit. So that's what I did!
I will warn you now that this dressing isn't for everyone. My partner isn't too fond of it; she finds balsamic vinegar too strongly flavored.
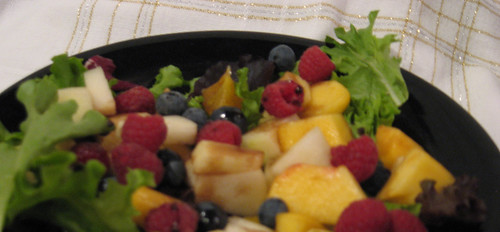
Citrus Balsamic Vinaigrette
I served it over fresh greens with pieces of apples, oranges, pears, and nectarines and several blueberries and raspberries. The dressing was wonderfully bright and tangy and set off the sweetness of the fruit nicely while providing a nice little savory tone to the salad.
I will warn you now that this dressing isn't for everyone. My partner isn't too fond of it; she finds balsamic vinegar too strongly flavored.
Citrus Balsamic Vinaigrette
1 cup dark balsamic vinegar
zest of 2 oranges
1/3 cup extra virgin olive oil
Soak zest in vinegar for about an hour. Strain.
Whisk in oil slowly until blended.
I served it over fresh greens with pieces of apples, oranges, pears, and nectarines and several blueberries and raspberries. The dressing was wonderfully bright and tangy and set off the sweetness of the fruit nicely while providing a nice little savory tone to the salad.
Monday, September 7, 2009
Beef and Barley Pot Roast
I just got back from a wonderful weekend trip, only to find that the weather has gotten much cooler at home. I don't want to turn on the heat this early in the year, but I do want to warm it up and drive off the chill. Plus, I'm still wiped from the travelling so I don't want to do a lot of work.
I grabbed some beef out of the freezer. Normally, I use fresh veggies in all my cooking, but to save time and energy (mine) I decided to go with a frozen stew mix and add a little celery and mushrooms. To that, I added barley and spices and tossed the whole thing in the oven.
Beef and Barley Pot Roast
Total prep time is less than half an hour, even using all fresh vegetables. You only need to check on it every once in a while to make sure there is enough fluid to cover the food. Putting it in the oven (or in a crockpot) meant I didn't have to worry about it scorching.
I added more barley one and half hours into the cooking as it didn't seem to have enough. This was both good and bad. There wasn't as much sauce as I was hoping for, but the mucilaginous quality of the barley was heightened.
As a result, the barley imparted a nice unctuousness to the dish while absorbing the saltiness of the beef and mushroom base. When I make this again, I plan to make my own broth to start with; this won't be an issue and I'll need to add salt.
All and all, a good meal for a damp, chilly day (yes, we do occasionally get them in the Inland Northwest).
I grabbed some beef out of the freezer. Normally, I use fresh veggies in all my cooking, but to save time and energy (mine) I decided to go with a frozen stew mix and add a little celery and mushrooms. To that, I added barley and spices and tossed the whole thing in the oven.
Beef and Barley Pot Roast
2 lbs. beef
1/2 lb carrots
1/4 lb celery (several stalks)
8 oz mushrooms
1/2 large onion or 8-10 pearl onions
1 cup barley (use more for a less soupy stew)
1 tablespoon beef base
1 tablespoon mushroom base
3 tablespoons chopped garlic
1/4 tsp black pepper
1/2 tsp thyme
1/2 tsp rosemary
1/4 tsp savory
3-4 bay leaves
Dissolve the beef and mushroom bases in a cup or so of water. Add it and all ingredients to 5 quart oven safe pan. Add water to cover. Cook at 270 for several hours, until done. Serve.
Total prep time is less than half an hour, even using all fresh vegetables. You only need to check on it every once in a while to make sure there is enough fluid to cover the food. Putting it in the oven (or in a crockpot) meant I didn't have to worry about it scorching.
I added more barley one and half hours into the cooking as it didn't seem to have enough. This was both good and bad. There wasn't as much sauce as I was hoping for, but the mucilaginous quality of the barley was heightened.
As a result, the barley imparted a nice unctuousness to the dish while absorbing the saltiness of the beef and mushroom base. When I make this again, I plan to make my own broth to start with; this won't be an issue and I'll need to add salt.
All and all, a good meal for a damp, chilly day (yes, we do occasionally get them in the Inland Northwest).
Monday, August 31, 2009
Devilled Eggs
When I was growing up, devilled eggs were a treat we got at Thanksgiving, Christmas, and Easter. When I moved out for college, I didn't make devilled eggs because they were too much trouble for just one person. But I missed them; boy did I miss them.
So when some friends asked me to cook dinner for 10, I jumped at the chance. I got to make my devilled eggs. Unfortunately, I didn't have a copy of my mother's recipe, so I needed to develop one of my own. Time to play with the spices!!!
Devilled Eggs
My mother used a yellow commercial preparation of mustard, but I think it makes the eggs too vinegary and wet. I really like the sharpness of the dried mustard. The yolk mixture turns out very creamy, yet a little firm.
I like to put the yolk mixture in a plastic bag and snip a corner off in the shape of a W. This gives me a pretty yolk filling without creating a lot of mess. When I'm done, I can just toss the messy bag; I've had too many pastry bags make a mess all over my hands.
So when some friends asked me to cook dinner for 10, I jumped at the chance. I got to make my devilled eggs. Unfortunately, I didn't have a copy of my mother's recipe, so I needed to develop one of my own. Time to play with the spices!!!
Devilled Eggs
2 dozen eggs, hard boiled
2 teaspoons dried bmustard
1-1/3 cups mayonnaise
1/2 teaspoon powdered garlic
1/4 teaspoon red pepper
1/4 teaspoon tabasco
1/8 teaspoon salt
1/4 teaspoon black pepper
2 tablespoons 2% milk
1/4 teaspoon tumeric
1/4 teaspoon paprika
Cut the eggs in half and remove yolks. Reserve egg whites.
Mash egg yolks and spices (except tabasco) together. Add milk, mayo, and tabasco and blend well. The mixture should be fairly smooth.
Fill egg whites with yolk mixture. There will be more filling than the yolk spaces will hold, so they will be mounded and puffy.
Garnish with paprika, capers, parsley, etc. Keep the garnish simple.
My mother used a yellow commercial preparation of mustard, but I think it makes the eggs too vinegary and wet. I really like the sharpness of the dried mustard. The yolk mixture turns out very creamy, yet a little firm.
I like to put the yolk mixture in a plastic bag and snip a corner off in the shape of a W. This gives me a pretty yolk filling without creating a lot of mess. When I'm done, I can just toss the messy bag; I've had too many pastry bags make a mess all over my hands.
Monday, August 24, 2009
Not quite a stir-fry
Late August is a favorite time of year of mine. Nearly all the vegetables I love are in season so I can go to town with them. Sometimes I grill them, sometimes I steam them, and yet other times I stir-fry them. Today I didn't quite do any of those.
Not Quite Stir-fry
Ginger and zucchini work really well together as a flavor combination. I was really happy with the way it turned out. It wasn't a stir-fry, per se, as I didn't cook it all the time on high and keep the food moving. I don't care -- it was yummy!
Not Quite Stir-fry
2 boneless chicken breast halves
2 small to medium zucchini
1/2 large onion
6-8 crimini mushrooms
2-4 tbsp soy sauce
2 tbsp chopped garlic
1/2 tsp powdered ginger
1/4 cup of water
15 oz rice
1/4 tsp salt
1/4 tsp black pepper
3 tsbp canola oil
1 tsp cornstarch
Slice the onions into slivers. Cut the zucchini into 2-3 inch strips that are a 1/4 inch thick. Cut each mushroom in half and slice. Slice the chicken into 2-3 inch strips 1/4 thick.
Start rice cooking. I will admit that I tend to use a rice cooker; it's more reliable for me than any other method I've tried.
Put the chicken in 2 tsbp of the soy sauce and stir until all is coated. Let marinade until the zucchini is nearly done sauteing.
Add oil to hot skillet. Saute the onions, mushrooms, and zucchini one at a time. Saute the onions until translucent, the mushrooms until they start to brown, and the zucchini until it softens and slightly browns. While sauteing the zucchini, add the salt to the pan to help the moisture rise to the surface.
While the vegetables saute, mix the soy sauce, garlic, and ginger in a food processor until the mixture is smooth. Add two tablespoons of water to mixture.
Once the onions and mushrooms are done, pull the chicken out of the soy sauce and place on a paper towel to drain. Once all the vegetables are done, lay the chicken in a single layer in the skillet. Brown each side. Once all the chicken is browned, remove all the chicken, and deglaze with the remaining water. Add the soy sauce mixture then reintroduce the chicken and vegetables. Simmer for a few minutes, until the zucchini and chicken are cooked.
Mix a tablespoon or so of water with the cornstarch and add. Simmer mixture until sauce has thickened. Serve over the rice.
Ginger and zucchini work really well together as a flavor combination. I was really happy with the way it turned out. It wasn't a stir-fry, per se, as I didn't cook it all the time on high and keep the food moving. I don't care -- it was yummy!
Tuesday, August 18, 2009
Soup starting
That last couple of weeks have been a little challenging. First I was on vacation and got sick, sick, sick. As in sounding like I was hacking up a lung sick -- and I was camping!
Second, I got home and was still sick. Then my partner got home and she got what I had. So chicken noodle soup was the special of the day for this weekend.
Anytime I roast a chicken or debone chicken for another recipe, I immediately make stock. Just chicken and a little salt -- no veggies, no other spices. This way, the chicken stock will be ready to be used anyway I see fit. I can always add the other stuff later.
As I was saying, the chicken broth came in really handy this weekend. I put the frozen broth, a 16 oz bag of frozen peas, a pound of carrots, four celery stalks, a large onion, three bulbs of garlic (keep cloves whole), four bay leaves, a couple of teaspoons of thyme, a teaspoon of black pepper, and a pound of mushrooms in a very large pan. I added five thighs and drumsticks to the mix and covered with water. Then I let it simmer for a couple of hours. After an hour, I pulled the meat, removed the bones, and replaced the meat. I also pulled the top two cups of fluid and set it in the fridge to separate. About half an hour before we wanted to eat, I added the defatted broth and thick country noodles.
The soup was really, really rich with a wonderful, silky mouth-feel. The soup was not really garlicky, probably because I left the cloves whole. I put so much stuff in it that the soup was somewhat stewy (but without a really thick gravy), so it was incredibly filling.
Monday, August 10, 2009
Product Review: Calphalon Everyday Pan
Disclaimer: Calphalon has not asked me to review this product; I am not receiving any compensation for this review. I am doing this because I enjoy using it and hope that you will too.
A little over a year ago, I found an amazing sale on Amazon. They had several Calphalon pans on sale for over 60% off! I bought two pans: a griddle and an everyday pan. Amazon listed their normal price as over $200 combined and I got them for under $60 (including shipping).
The everyday pan is everything the ad suggested it would be. I would use it everyday if I could. I can't because I don't cook everyday and because, well, it doesn't boil pasta very well. But it does everything quite nicely. I've braised meat in it, cooked seafood, made my favorite pinto, etc.
I like to use it in place of a skillet. The pan has a broad, flat bottom with sloping sides, so there's a lot of heated surface to place the food on (especially if I can manage to keep it on my ceramic stove-top burners, but that's another story). The pan heats quite evenly, so food around the outside cooks nearly as quickly as the food near the center.
The everyday pan's two-"helper" handle design is wonderful. With two small "helper" handles on the sides, like a five-quart pot, turning food out of the pan is a snap -- no awkward wrist contortions to get to the food. In addition, there are no long handles to get in the way of my other burners; I can use them all!
If I had one complaint about the pan, it's that I can't put it in the dishwasher without voiding the lifetime warranty. Fortunately, the anodized surface is easy to clean, nearly as easy as Teflon (eww, ick). That's all to the good as I really don't have much elbow grease anymore.
Monday, August 3, 2009
Blending Spices
The last few recipes have used a spice blend called powder douce. Powder douce is a medieval sweet spice blend that can contain up to 15 spices, including salt and sugar. Another medieval spice blend is powder fort, a blend of strongly flavored spices, also including salt and sugar. In fact, these two spice blends have many spices in common: sugar, salt, cinnamon, and ginger to name a few.
Modernly we use spice blends all the time. Who hasn't used curry powder or poultry seasoning? Years ago, I looked at what was in poultry seasoning and decided I could do better on my own. I didn't like how muddled the flavors of the spices in premade mixes were, and they only got worse as they sat on my shelf.
I've had several friends who ask me how I decide what spices to use and how much to use when I create my blends. I'm always left puzzling out how to answer this and still make sense. To start with, I try to figure out what I want the blend to taste like. For instance, when I developed my curry blend (below), I had the flavors at a favorite restaurant in Pittsburgh, Sree's, to model on. I knew I needed coriander, cumin, tumeric, garlic, cinnamon (cassia not ceylon), cayenne pepper, black pepper, and some other spices to be named later.
I start by smelling the spices. I waft one bottle in front of me, then rapidly follow it with a second and third bottle so the scents mingle. I believe that if the spices smell good together, they will taste good together.
Once I've found a base of scents I like, I add them to the bowl, one teaspoon at a time. As I select a spice, I waft it past the bowl to see how I like the mixed scent. Spices I know I want to be less strong, I start with 1/4 teaspoon or the 1/2 teaspoon. If I want to increase the spice's flavor, I increase it by a 1/4 teaspoon at a time. Once I get the scent I like in the bowl, I stop.
And this is what I got.
Sue's Curry Powder
8 teaspoons cumin
8 teaspoons coriander
4 teaspoons tumeric
2 teaspoons powdered ginger
2 teaspoons garlic
2 teaspoons black pepper (not white, green, or pink)
1 teaspoon cayenne pepper
1 teaspoon brown mustard seeds
1/2 teaspoon cinnamon
1/2 teaspoon mace
1/2 teaspoon cloves
Mix well together. I prefer to use a small food processor since the mustard isn't powdered. This powder is a mild curry; for more heat, increase the cayenne pepper. For anyone who doesn't like any heat, remove it and increase the cloves and ginger by 1/4 teaspoon to maintain the curry's sharpness.
Not only have I used this blend in curries, I also like to add it to cheese sauces and meat marinades.
Monday, July 27, 2009
Ember Day Tarts
This is the last of the recipes I worked up for a party a week or so ago. I wanted a pie that people who were vegetarian or Jewish could eat during the party. An herb, egg, and cheese pie seemed to fit the bill.
Ember Day tarts were pies in the Middle Ages that were eaten on non-meat days.
Ember Day Tart
Original Recipe
Translation
Redaction
I opted not to put the butter and sugar in the tart as I wanted something that was more savory than sweet and the butter and sugar were in the pie dough. I used pie dough to make this a little easier to serve and eat in a picnic setting.
The recipe calls for a fresh cheese. Most recreations of this recipe use farmer's cheese. I used ricotta cheese (another style of fresh cheese) instead because I wanted a little more moisture and creaminess than
Most Ember Day tarts I've had have spinach, onions, and parsley or just spinach and onions. They were good pies, but I wanted a little extra spark in mine. Tarragon and basil were just the trick!
While I only made two of these for the party, they really went over well. I never expected it would be so easy to get people to eat spinach! So much so, that I didn't get a piece of it for myself.
Ember Day tarts were pies in the Middle Ages that were eaten on non-meat days.
Ember Day Tart
Original Recipe
Curye on Inglysch
Page 136, Recipe 173
Tart in ymbre day. Take and perboile oynouns & erbis & presse out Þe water & hewe hem smale. Take grene chese & bray it in a mortar and temper it vp with ayren. Do Þereto butter, safroun & salt, & raisouns corauns, & a litel sugur with powdour douce, & bake it in a trap, & serue it forth.
Translation
Tart in Ember Day. Take and parboil onions and herbs and press out the water and chop them small. Take green cheese and grind it in a mortar and temper it up with egg. Add butter, saffron, and salt, and currants and a little sugar with powder douce and bake it in a trap and serve it forth.
To bake a pie in a trap is to bake it in a baking dish. Note the original recipe does not call for a crust.
Redaction
1 lrg Onion
9 oz Spinach (Raw)
.75 oz Tarragon
2 oz Basil
15 oz Ricotta
3 Eggs
½ tsp Salt
¼ tsp Saffron
½ cup Currants
1 ¾ tsp Powder Douce
½ tsp Cinnamon
½ tsp Coriander
¼ tsp Clove
¼ tsp Nutmeg
¼ tsp Mace
[optional]Pie Dough (use the same recipe as in the pork tart)
Parboil the onions and herbs and drain well. These will need to have the excess water pressed out. Once the water is removed, chop the herbs and onions small.
Take the ricotta and put in large bowl. Break up into small pieces, then add egg and mix. Add herbs, salt, currants, and spices and mix well.
If you are using pie dough, roll out dough and place in pan. If you are not, you should liberally butter the pan.
Put herb and cheese mixture in pie shell. Bake at 350° 35-45 minutes until set.
I opted not to put the butter and sugar in the tart as I wanted something that was more savory than sweet and the butter and sugar were in the pie dough. I used pie dough to make this a little easier to serve and eat in a picnic setting.
The recipe calls for a fresh cheese. Most recreations of this recipe use farmer's cheese. I used ricotta cheese (another style of fresh cheese) instead because I wanted a little more moisture and creaminess than
Most Ember Day tarts I've had have spinach, onions, and parsley or just spinach and onions. They were good pies, but I wanted a little extra spark in mine. Tarragon and basil were just the trick!
While I only made two of these for the party, they really went over well. I never expected it would be so easy to get people to eat spinach! So much so, that I didn't get a piece of it for myself.
Monday, July 20, 2009
Apple Tarts
Okay, I must be insane. I have been baking in July, in 90°F temperatures. But the results have been soooo yummy.
The most recent pies were apple tartlets. And yes, these are medieval in origin. They serve as a nice reminder that everything old is new again.
Apple Tart
Original Recipe
Translation
Redaction
I wanted a pie that could be hand-held, didn't make a mess, and eaten cold. I started by cutting the dough into about 4" rounds and folding the sides up and sealing the top and ends. Success on the hand-held part.
The figs and raisins provide all the sweetness for the filling; no sugar is necessary. As a result, I don't have a syrupy filling, which is all to the good. No goo oozes out of the pie and onto hands or clothes. Success on the not making a mess part.
These pies are excellent cold. In fact, I think they are better cold than warm. Definite success on the eaten cold part.
I definitely recreated the recipe backwards. I started by making a large batch of pies (70+ 4"inch rounds) so I didn't really pay much attention to how much filling I made. I also had dithered between making the pies totally hand-held or putting them into individual tart pans and didn't make a decision until I started rolling out the dough. Let's just say I had oodles of filling left over, so I plan to use it in as a compote with shortbread later. I have scaled the above recipe down from the initial experiment. I'm not entirely sure how many pies this recipe will fill; I was making little tarts.
The most recent pies were apple tartlets. And yes, these are medieval in origin. They serve as a nice reminder that everything old is new again.
Apple Tart
Original Recipe
Curye on Inglysch
Page 78, Rec 82
For to make tartys in apples, take gode applys & gode spyces & figys & reysons & perys & wan Þey arn wel ybrayed color wyÞ safroun wel & do yt in a cofyn & do yt forth to bake wel.
Translation
For to make tarts in apples, take good apples and good spices and figs and raisins and pears and when they are well pounded, color with saffron well and do it in a coffin and bake it well.
I used the Middle English Dictionary to translate terms I didn't understand.
Bray means well-pounded or cut into very small pieces.
Redaction
2 Apples (Gala apples are similar to European apples)
1 tsp Cinnamon
1/4 tsp Nutmeg
1/4 tsp Clove
1/3 tsp Coriander
1/8 tsp Mace
3 oz Figs
2 oz Raisins
1 Pear
1/4 tsp Saffron
1/4 tsp salt
Single batch of Pie Dough (use the same recipe as in the pork tart)
Peel apples and pears. Peel and chop apples, pears, and figs into small pieces. Add raisins and spices. Mix well.
The original recipe calls for a thick free-standing pie crust about 1" to 2" tall, but a thinner pie crust in a pan will work. Roll pie dough for 9" pies or 4" mini tarts. Put mixture to pie dough and bake at 350°F until done. I was doing 4" rounds folded over on themselves, so they were taking about 15 minutes.
I wanted a pie that could be hand-held, didn't make a mess, and eaten cold. I started by cutting the dough into about 4" rounds and folding the sides up and sealing the top and ends. Success on the hand-held part.
The figs and raisins provide all the sweetness for the filling; no sugar is necessary. As a result, I don't have a syrupy filling, which is all to the good. No goo oozes out of the pie and onto hands or clothes. Success on the not making a mess part.
These pies are excellent cold. In fact, I think they are better cold than warm. Definite success on the eaten cold part.
I definitely recreated the recipe backwards. I started by making a large batch of pies (70+ 4"inch rounds) so I didn't really pay much attention to how much filling I made. I also had dithered between making the pies totally hand-held or putting them into individual tart pans and didn't make a decision until I started rolling out the dough. Let's just say I had oodles of filling left over, so I plan to use it in as a compote with shortbread later. I have scaled the above recipe down from the initial experiment. I'm not entirely sure how many pies this recipe will fill; I was making little tarts.
Monday, July 13, 2009
Venison Pie
I am working out some recipes for a party I'm hosting next weekend. A couple of weeks ago, I worked out the pork pie recipe. Next on my list was refining the venison pie recipe. This one had a major challenge: I had a very limited supply of venison, so I didn't want to use it up perfecting the recipe.
I decided to try this recipe on beef and was quite underwhelmed. Then I gave it a shot with venison. This is definitely a recipe where beef is decidedly inferior to venison. While they share some elements in their flavor profile (to the point that they can often be substituted for one another), they are not identical. Ginger brings out much more complexity in venison than it does in beef.
Venison Pie
As stated in the pork pie recipe, recreating medieval recipes pose some challenges. Even English recipes do. Middle English is not Modern English; there are words in Middle English that no longer are used in Modern English, especially cooking terms.
Original Recipe
Two Fifteenth Century Cookery Books, Page 51, Recipe xix (this source is available through Google Books)
Translation
Redaction
Deviations from the Original Recipe
I originally wasn't going to boil the venison, but it really does help the flavor by providing a nice vehicle for the spices and keeps the venison moist. Venison is naturally low in fat, so it responds very well to a moist cooking method. I kept the fluid to a minimum because I didn't want soggy pies.
These pies are really lovely eaten cold (which is how I had planned to serve them). As a result they are a great picnic or camping food.
I decided to try this recipe on beef and was quite underwhelmed. Then I gave it a shot with venison. This is definitely a recipe where beef is decidedly inferior to venison. While they share some elements in their flavor profile (to the point that they can often be substituted for one another), they are not identical. Ginger brings out much more complexity in venison than it does in beef.
Venison Pie
As stated in the pork pie recipe, recreating medieval recipes pose some challenges. Even English recipes do. Middle English is not Modern English; there are words in Middle English that no longer are used in Modern English, especially cooking terms.
Original Recipe
Two Fifteenth Century Cookery Books, Page 51, Recipe xix (this source is available through Google Books)
Venyson y-bake. Take hogħes of Venyson, & parboyle hem in fayre Water an Salt; & whan Þe Fleyssche is fayre y-boylid, make fayre past, & cast Þin Venyson Þer-on; & caste a-boue an be-neÞe, pouder Pepir, Gyngere, & Salt, & Þan sette it on Þe ouyn, & lat bake, & serue forth.
Translation
Take hocks of venison and parboil in fair water and salt and when the flesh is well boiled, make a good past and put the venison in and put powdered pepper, powdered ginger, and salt above and beneath it. Set it in the oven and let bake and serve forth.
Redaction
1 lb Venison (ground)
1 cup Beef broth containing:
4 juniper berries
12 peppercorns
1-1/2 teaspoon Powdered Pepper
3 teaspoon Powdered ginger
1/2 teaspoon salt
1/2 cup water
Single batch of Pie Dough (use the same recipe as in the pork tart)
Boil the venison in the beef broth. Once the venison is mostly cooked, add spices and mix well. Let cool. Once the venison is cooled, add the 1/2 cup of water to ensure the filling is moist (but doesn't have standing fluids).
Roll pie dough out. Cut rounds about 4" in diameter (I used a mini-Bundt pan for a pattern). Put a tablespoonful or so of venison mixture in the center of each pie, fold over, moisten half the circumference of the circle, and seal. If you need more pie dough (I was working with much larger quantities of filling and pie dough) Bake on cookie sheet in 350° oven for 25 minutes.
Deviations from the Original Recipe
I started with beef broth, mostly because I didn't have any venison bones to make broth from. I added the peppercorns and juniper berries to the broth to create a little more depth of flavor.
I used ground venison instead of boiling the venison then chopping it small. It was a lot faster and easier, especially since I was making 40 of these things.
The recipe is actually for venison in a free-standing shell called a coffin. In medieval times, this is one way food was cooked and served. The coffin was not eaten; instead it was placed in an alms-basket for the poor. I wanted a pie that could be eaten by hand, so I made the half-circle pies.
I originally wasn't going to boil the venison, but it really does help the flavor by providing a nice vehicle for the spices and keeps the venison moist. Venison is naturally low in fat, so it responds very well to a moist cooking method. I kept the fluid to a minimum because I didn't want soggy pies.
These pies are really lovely eaten cold (which is how I had planned to serve them). As a result they are a great picnic or camping food.
Monday, July 6, 2009
Grilled Salmon
This past weekend was warm. Warm as in over 90 degrees each day. Cooking was not a high priority; I really didn't want to heat up my kitchen. It's on the first floor of the house and that is the cool floor. Grilling was my only other option. Who's going to notice if I heat up the outside by a fraction of a degree?
I know, I know: I need more pictures. But I was hot, tired, and sore so pictures weren't high on my list of priorities. I just wanted to make dinner and get it over with.
A couple of weeks ago, the local grocery store had sides of salmon on sale; welcome to the Pacific Northwest. We eat salmon like Maine eats lobsters. And salmon works well on the grill.
Grilled Salmon
I like the orange/soy/honey glaze on the salmon. The glaze prevents the salmon from drying out on the grill. Then the orange and soy really bring out the savoriness of the salmon while the honey helps highlight its natural sweetness.
I know, I know: I need more pictures. But I was hot, tired, and sore so pictures weren't high on my list of priorities. I just wanted to make dinner and get it over with.
A couple of weeks ago, the local grocery store had sides of salmon on sale; welcome to the Pacific Northwest. We eat salmon like Maine eats lobsters. And salmon works well on the grill.
Grilled Salmon
1 fillet of salmon
1 tsp of orange juice (fresh squeezed is best)
1 tsp soy sauce
1/2 tsp honey
1/2 tsp canola oil
Spread the skin-side of the salmon with the canola oil; this side will be in contact with the grill. Mix the soy sauce and orange juice together and spread a little (1/4) of the sauce on the muscle-side of the salmon. Let sit for five minutes or so to marinate.
Heat the grill to a medium-low heat.
Mix the honey in the remaining sauce. Place the salmon on the grill, skin side down. Baste the muscle-side with the sauce. Grill for about 15 minutes, basting halfway through the cooking time.
Serve with rice or potatoes and a green vegetable.
I like the orange/soy/honey glaze on the salmon. The glaze prevents the salmon from drying out on the grill. Then the orange and soy really bring out the savoriness of the salmon while the honey helps highlight its natural sweetness.
Monday, June 22, 2009
Pork Tart
Meat pies are something that is not done enough in the U.S. That's a shame because meat pies are amazing -- rich and filling. And they are really, really easy to make.
I found a really good recipe for pork filling in a book called Curye on Inglysch. The book is a collection of fourteenth century recipes. The pie dough is from Two Fifteenth Century Cookery Books. However, these cook books provide two big challenges:
Pork Filling
Original Recipe
Curye on Inglysch, Page 136, Recipe 172
Pork Filling Recreation
Deviations from Original Recipe
I didn’t boil the pork. Often boiling meat leads to a loss of moisture and fat. Since modern pigs are being bred for leanness, I decided not to boil the pork.
Braying in Middle English means to pound or to grind. I decided to chop the pork into small pieces that would provide a firmer texture than a grind might. I thought this would appeal to a more modern sense an appropriate texture of meat.
The recipe only specifies “powder douce” or sweet powder. Some recipes I’ve seen for powder douce (and for powder forte) use upwards of 15 ingredients, including ginger and sugar. Since both are included in the recipe on their own right, I decided to go with a simpler powder douce that would complement the flavor of the pork.
I removed the prunes. I don’t particularly care for their flavor on their own and didn’t think they would complement the meat and spices as well as I would like. In addition, while the medieval palate is for a sweeter, more fruity mix (in part to stretch the number of servings of meat), I prefer less fruit with my meat.
Pie Dough
Original Recipe
Two Fifteenth Century Cookery Books, Page 74, sn. Pety Pernantes
Explanation in Modern Terms
I found a really good recipe for pork filling in a book called Curye on Inglysch. The book is a collection of fourteenth century recipes. The pie dough is from Two Fifteenth Century Cookery Books. However, these cook books provide two big challenges:
- These recipes are written in Middle English. If you read the text aloud, sounding it out exactly as it is spelled, you will understand most of it. You do need a Middle English translation dictionary (http://quod.lib.umich.edu/m/med/ is pretty good).
- Like most of the recipes, some key information is missing -- most notably quantities. With a little experimentation, most of the recipes can be worked out.
Pork Filling
Original Recipe
Curye on Inglysch, Page 136, Recipe 172
Tartee. Take pork ysode; hewe it and bray it. Do Þerto ayren, raisouns courauns, sugur and powdour of ginger, powdour douce and smale brides Þeramong, & white grece. Take prunes, safroun, & salt; and make a crust in a trap, & do Þe fars Þerin; & bake it wel & serue it forth.Explanation in Modern Terms
Tarte. Take boiled pork, chop it and grind it. Add egg, currants, sugar, and ginger powder, powder douce and small birds there-among, and lard. Take prunes, saffron, and salt and make a crust in a trap and put the meat and bake well and serve forth.I used the Medieval English Dictionary found at http://quod.lib.umich.edu/m/med/, and the translations provided in the index of Curye on Inglysch to translate what the following terms meant.
- Ysode – to seethe, to boil
- Bray – to grind or to pound. In this context, to grind the meat made sense.
- Ayren – eggs
- Brides – birds
- Trap – a dish to lay the crust in.
Pork Filling Recreation
2 lbs Pork
3 Eggs, large
½ cup Currants
1 tbsp Sugar
1 tsp Ginger
Powder Douce: (I hand ground these as that is how they were treated in medieval times)
1 stick cinnamon
1/8 nut of nutmeg
1 tsp coriander seeds
1 tsp Salt
1 Cornish Hen
¼ tsp Saffron
1 tbp Bacon fat
Pie Dough (enough for a top and a bottom crust)
Roll pie dough and lay in a dish ~1 inch deep.
Chop the pork into small bits. Debone and chop Cornish hen in small pieces. Mix meats and salt and let sit for 10 minutes. Add egg, currants, spices, and fat and mix.
Put mixture in the pie shell and bake at 350° until done (170° or until the egg has set, approximately 45 minutes to an hour).
Deviations from Original Recipe
I didn’t boil the pork. Often boiling meat leads to a loss of moisture and fat. Since modern pigs are being bred for leanness, I decided not to boil the pork.
Braying in Middle English means to pound or to grind. I decided to chop the pork into small pieces that would provide a firmer texture than a grind might. I thought this would appeal to a more modern sense an appropriate texture of meat.
The recipe only specifies “powder douce” or sweet powder. Some recipes I’ve seen for powder douce (and for powder forte) use upwards of 15 ingredients, including ginger and sugar. Since both are included in the recipe on their own right, I decided to go with a simpler powder douce that would complement the flavor of the pork.
I removed the prunes. I don’t particularly care for their flavor on their own and didn’t think they would complement the meat and spices as well as I would like. In addition, while the medieval palate is for a sweeter, more fruity mix (in part to stretch the number of servings of meat), I prefer less fruit with my meat.
Pie Dough
Original Recipe
Two Fifteenth Century Cookery Books, Page 74, sn. Pety Pernantes
Pety Pernantes. Take fair floure, Sugur, Saffron, and salt, and make paast Þer-of; then make small coffins then cast in eche a coffin iij or iiij raw yolkes of egges hole, and ij gobbets or iij of Mary couche Þerin; Þen take powder of ginger, Sugur, Reysons of Corans, and cast above; Þen cover the coffin with a lyd of Þe same paste; then bake hem in a oven, or elles fry hen in fair grece fresh, And then serve hit forthe.
Explanation in Modern Terms
As this recipe is for an egg and meat pie, it is appropriate for the pork pie filling as well. I am only using the pie dough (or paste) from this recipe:Pie Dough RecreationTake fair flour, sugar, saffron, and salt and make paste there of. Then make small coffins…then cover the coffin with a lid of the same paste, then bake them in an oven or else fry them in fresh grease. And then serve it forth.
Note this recipe does not instruct the cook to use water or any other fluid to make the paste. However, fluid must be added to the dry ingredients to get a paste.
20 oz FlourDeviations from the Original Recipe
¼ lb Butter (room temperature)
¼ tsp Salt
¼ tsp Saffron
1 tsp Sugar
1 cup Water (plus/minus 2 tsp, depending on the dryness of the flour and the humidity of the air)
Mix the flour and butter together by rubbing it between the hands until the mixture becomes mealy. Mix the remaining dry ingredients together and add to the flour/butter mixture. Add water, starting with ¾ cup and adding in teaspoon increments until the dough forms a ball that is slightly tacky to the touch (like a baby’s bottom).
Roll out the dough to fit the pan. Fill pie with filling and cover with second crust.
As I stated above, the recipe does not call for any fluids to be added to the dry ingredients; however, you can not make paste from those ingredients without fluid. Therefore I added water.
In addition, the recipe doesn’t call for any fats. However, later period recipes (Markham, 1986, p. 96; Dawson, 1596, p. 11) call for fat (and sometimes eggs) in pie doughs.
Monday, June 15, 2009
Gluten-free Shortbread
I love to make shortbread. I have an amazing recipe that results in a wonderfully buttery, sweet shortbread. Unfortunately, a dear friend of mine is on a no-gluten, no-potato-starch diet. So I am trying to make shortbread with a gluten-free flour. Unfortunately, the no-potato-starch aspect of the diet has made finding a gluten-free flour difficult as potato starch is a good protein replacement.
Bob's Red Mill has come to my rescue! They make a biscuit and baking mix that is free of both gluten and potato starch.
Gluten-free Shortbread
This was a little gritty and dry immediately after baking. The soy flour was definitely there in flavor, but was not overpowering as I had feared.
I took the shortbread to a gaming night a couple of nights later. The moisture levels in the shortbread had equalized nicely. While it was a little more crumbly than I prefer, it was no longer as dry and gritty as it was right after it was baked. And the shortbread tasted better than when it was first out of the oven. I think I want to increase the fat and sugar a little. I want the shortbread a little moister and sweeter, but for those who don't like overly sweet shortbread, this should be just about perfect.
Bob's Red Mill has come to my rescue! They make a biscuit and baking mix that is free of both gluten and potato starch.
Gluten-free Shortbread
4 cups gluten-free flour
1-1/4 cups confectioner's or caster sugar
1/4 teaspoon of salt
1 pound of unsalted butter
Preheat oven to 325°F (162°C).
Cream the sugar and butter together until light and creamy. Add the flour and salt and knead until combined.
Place in baking pan. The dough should not be more than 1/2 inch thick. I use two round (8-inch and 10-inch) springform pans. Bake for 20-25 minutes.
Decorate if desired. I have been known to use decorator gels and/or colored sugar.
This was a little gritty and dry immediately after baking. The soy flour was definitely there in flavor, but was not overpowering as I had feared.
I took the shortbread to a gaming night a couple of nights later. The moisture levels in the shortbread had equalized nicely. While it was a little more crumbly than I prefer, it was no longer as dry and gritty as it was right after it was baked. And the shortbread tasted better than when it was first out of the oven. I think I want to increase the fat and sugar a little. I want the shortbread a little moister and sweeter, but for those who don't like overly sweet shortbread, this should be just about perfect.
Monday, June 8, 2009
Sauces
Sauces are something that are too often given too little thought by the home cook. I'm not talking about spaghetti sauce or gravy, but about sauces that garnish the dish and add yet another dimension of flavor. I know a number of cooks who thinks sauces are hard or time-consuming. Not always! I often whip up a quick sauce while the main dish is cooking.
My staple ingredients for many sauces are orange juice, soy sauce, wine, and balsamic vinegar. Some days I'm in the mood for a simple wine or balsamic reduction to go with a vegetable; other days I want something to make a dish sparkle.
Reductions
Reductions are simple: put your liquid ingredients into a saucier or sauce pan (though a small skillet works well for small amounts of fluid). Simmer on med-low until the sauce has reduced to the consistency you want, usually by at least half. If you are reducing vinegar, make sure you have your exhaust fan going well -- heated vinegar is a bit sharp and will sting your eyes and nose. Once the food is done, drizzle the sauce over it.
These first two recipes work nicely on vegetables. I've used the second two on meat with nice results. I add salt, if necessary, afterwards, because reductions concentrate the flavors.
Orange-Soy SauceI also reduce the marinades I use for meats into a sauce to go over them.
1/2 cup of orange juice, fresh squeezed is best
1/2 cup of soy sauce or tamari sauce
1/4 teaspoon of microplaned orange zest
Orange-Balsamic Sauce
1/4 cup of orange juice, fresh squeezed is best
1/2 cup of dark balsamic vinegar (I like the thicker vinegar for this)
1 - 1-1/2 teaspoons of honey (depending on how sweet you like it)
Garlic-Wine Reduction
1 cup of wine, red or white depending on what I'm cooking (use something with enough body to stand up to the heat -- merlot, syrah, cabernet sauvignon, chardonnay, or sauvignon blanc)
1 tablespoon of garlic, chopped finely (this will be need to be strained out of the sauce)
Monday, June 1, 2009
Gallo Pinto (Beans and Rice)
Gallo pinto (or just pinto) is a Costa Rican (or Tico) breakfast I was introduced to when I lived down there several years ago. In typical Tico thriftiness, the leftover black or red beans and rice from dinner the night before are mixed together, put in the fridge overnight, and fried in the skillet the next morning. Ticos serve pinto with bistek (a cube steak-like cut of meat), fried plaintains, or a scoop of sour cream; orange juice; and coffee. Tico restaurants serve it as a breakfast meal like American restaurants serve eggs.
I don't quite make it the traditional way, nor do I make it only for breakfast. It's great any time of day.
Gallo Pinto
The first time a Tico suggested adding sour cream, I was skeptical. Then I tried it. The creamy tang of the sour cream really brings out the flavor of the beans and is a nice contrast to the crisped rice.
Pinto works well as a meal for any time of day. In the hot summer months, serve with a side of corn for a full protein and skip the heavy meat.
I don't quite make it the traditional way, nor do I make it only for breakfast. It's great any time of day.
Gallo Pinto
15 oz of cooked black or red beans (if using canned, drain)
3 cups or so of rice (I like about equal parts rice and beans but the proportions vary based on how much rice I have)
1/2 tsp ground cumin
1/2 tsp ground coriander
1 tsp dried cilantro (not everyone likes cilantro, so you might want to adjust based on taste)
1 clove garlic chopped
1 tablespoon butter
salt
pepper
Melt butter in a skillet on medium-high heat. Put the beans, rice, and spices (except salt and pepper) in the skillet and fry. In Costa Rica, the beans and rice are crisped on the bottom of the pan ; this works best with beans and rice mixed the night before.
Salt and pepper to taste. Ticos don't use a lot of black pepper, so I tend to skip it. Besides I think too many American dishes use pepper as a substitute for real flavor.
Serve with bacon, thinly-sliced beef, fried plantains, eggs, or sour cream.
The first time a Tico suggested adding sour cream, I was skeptical. Then I tried it. The creamy tang of the sour cream really brings out the flavor of the beans and is a nice contrast to the crisped rice.
Pinto works well as a meal for any time of day. In the hot summer months, serve with a side of corn for a full protein and skip the heavy meat.
Monday, May 25, 2009
Grilled Veggies
Summer's here!!! Or almost here anyway. It will be a few weeks before the weather is reliably warm and sunny; that doesn't usually happen until around the 4th of July. But, we've started getting nice, sunny, warm days here and there. The first of the fresh local (or at least Californian) produce has started to come into the stores.
One local store had fresh corn in this week. It's early for the really best flavor in the corn, but it's the first corn of the season. So it will have its own inherent goodness. I don't like boiled corn on the cob; I find it gets waterlogged and not evenly done. I actually prefer my corn done with a wood fire, but my fireplace isn't really deep enough for a fire big enough to do it right. I've done the corn when I'm camping as long as camp fires are permitted. Once we get late enough into the summer season, the state really clamps down on open fires in fire pits -- fires in this area can be 10,000 or more acres big; last year we actually had a wildfire within city limits.
So I will settle for doing my corn on the grill.
Grilled Corn
The corn tends to be a little tougher then boiled corn, but is much sweeter and more flavorful.
One thing to remember is, if you can go lightly on the salt and butter, corn is a really healthy dish. It's a whole grain, so you get those benefits. And, paired with beans and rice, creates a whole protein, so it's a great alternative to meat dishes during the heat of summer.
Corn isn't the only vegetable that can be grilled. Asparagus, zucchini, squash, onions, beets, and mushrooms all respond well. When grilling these vegetables, place the vegetables on a sheet of foil, add oil and spices, and fold the foil around them (as shown on the commercials works well). Make sure the folded over areas are sealed well as the vegetables will need to be turned over to cook evenly. If oil leaks out, it might flame up and scorch any meat or vegetables on the grill.
One local store had fresh corn in this week. It's early for the really best flavor in the corn, but it's the first corn of the season. So it will have its own inherent goodness. I don't like boiled corn on the cob; I find it gets waterlogged and not evenly done. I actually prefer my corn done with a wood fire, but my fireplace isn't really deep enough for a fire big enough to do it right. I've done the corn when I'm camping as long as camp fires are permitted. Once we get late enough into the summer season, the state really clamps down on open fires in fire pits -- fires in this area can be 10,000 or more acres big; last year we actually had a wildfire within city limits.
So I will settle for doing my corn on the grill.
Grilled Corn
Several whole ears of corn, unshucked (how many depends on how many you want to serve and how hungry they are)
Aluminum foil
Butter
Salt
Pepper
Remove the tough, dried outer layer of leaves on each ear. Carefully pull back (but not off) the leaves to expose the corn. Remove the silt. Replace the leaves over the corn. They won't fold back quite as tightly over the ear, but that's okay.
Once all the ears are cleaned, place in a pan or bowl large enough to fit them. Cover with water; the ears will float so they will need to be weighted down. Soak for at least 30 minutes.
Drain the excess water out of the ears. Place each ear on a sheet of aluminum foil and loosely wrap (this is not absolutely necessary, but I don't like ash on my corn and I don't like the flavor the scorched outer leaves create). Crimp each end but don't twist or otherwise tightly close. The goal is to roast, not steam the corn.
Place in a single layer on a medium-hot grill or in the coals of a fire. Do not let ears touch on the grill; you want the heat to circulate around them. Turn the ears every 10 minutes or so to ensure even cooking. After 30 to 45 minutes, the corn will be done.
Add butter, salt, and/or pepper as desired.
The corn tends to be a little tougher then boiled corn, but is much sweeter and more flavorful.
One thing to remember is, if you can go lightly on the salt and butter, corn is a really healthy dish. It's a whole grain, so you get those benefits. And, paired with beans and rice, creates a whole protein, so it's a great alternative to meat dishes during the heat of summer.
Corn isn't the only vegetable that can be grilled. Asparagus, zucchini, squash, onions, beets, and mushrooms all respond well. When grilling these vegetables, place the vegetables on a sheet of foil, add oil and spices, and fold the foil around them (as shown on the commercials works well). Make sure the folded over areas are sealed well as the vegetables will need to be turned over to cook evenly. If oil leaks out, it might flame up and scorch any meat or vegetables on the grill.
Tuesday, May 19, 2009
Terroir Tasting, continued
To my readers: Sorry I didn't post last night. We went to Canada over the weekend and when I got home from work last night it was just about all I could do to make dinner and go upstairs to bed.
To continue my thoughts regarding terroir, I've taste-tested coffees and chocolates from various regions around the world. And in so doing, I know I've tasted the terroir of these regions. So the question is: why can I taste the terroir of coffee and chocolate, but didn't recognize it in the wine?
Part of the answer lies in the products themselves and how they are treated. With coffee there is a limited amount of processing that can affect the flavor significantly: type of tree planted (robusta vs. arabica), ripeness at harvest, wet/dry processing, darkness of roast, size of grind, and type of brew (drip, percolate, boil). None of these processes affect the fundamental character of the coffee; the most they can do is highlight certain flavor notes the drinker is interested in. Granted which sub-type of arabica that is grown does affect the flavor, but overall, the character of the microclimate/microgeology (I will use these terms for the physical nature of terroir to keep it distinct from the flavor nature) still come through.
In producing a bottle of wine, the vintner makes many more decisions that will affect the flavor of the final product. Not only does he choose the variety of grape, irrigation, fertilization, etc., just as the coffee producer does with coffee, but he also chooses the variety of yeast he uses (and there are dozens, each with their own characteristic flavor they lend to the wine), how long the fermentation occurs, whether he ages in steel or oak barrels, how long he ages the wine, whether he blends wines from different fields or different years, when and how he clarifies/racks the wine, how and if he stops the fermentation, whether or not to add sugar to increase the sweetness (or the alcoholic yield), to name a few. I find that these decisions more strongly affected the flavor profiles of the wines we sampled than did the microclimate/microgeology.
As I said last week, none of those who were tasting were experienced in sampling the terroir of wine. I believe to fully appreciate terroir I will need some guidance from oeniphiles more experienced in discerning its distinction than I am. I'm not surprised by this; I know there's a lot more out there for me to learn about wine.
Monday, May 11, 2009
Terroir Tasting
The terroir tasting party went well. We had 16 bottles of pinot, but only opened about eight. We had five French wines, three Canadian, four American, one Australian, one New Zealand, and one Chilean. I actually think our variety was a little too broad for us to identify what we were looking for. I also need to do more research before we do this again (and it's expensive!).
However, the night was not all lost. Our group had some very interesting observations. We noticed the difference the vintner made more than we could identify the difference the microclimate/microgeology. We had two bottles by the same vintner who seemed to be from different areas of Côte du Rhône. Both wines were substantially similar in flavor and color; there was not much difference.
We also noticed a distinct difference in the French aesthetic separate from the non-French aesthetic. French pinots were a bit fruitier than non-French wines. Non-French wines tended to be mineral-y and spicy. However, there was one American wine that clearly aimed for a French aesthetic; Mirassou was clearly fruitier than most non-French wines.
The primary lesson I learned is I need to find a more knowledgeable sommelier and attend more of the local wine-tasting seminars held at the specialty grocery and wine stores. I also need to spend more time with the pinot noirs; while they are not as full-bodied as my preferred merlots and shiraz, they titillate both the tongue and nose with their bouquet and subtle depth of flavor.
Monday, May 4, 2009
Terroir
Next weekend, we are having a group of people over for wine-tasting. The goal is to learn how to discern the terroir of wine -- i.e., the effects microclimates have on the personality (flavor and quality) of wine. Reisling and pinot noir are the varieties whose flavors are most reflective of their terroir. Given most of our guests are red-wine drinkers, we are sampling pinot noirs.
Why look at terroir? Because terroir contributes to the distinctiveness of each wine producing region. This is not to say that the vintner has little to do with the wine; in fact this is far from the case. One of the most important decisions the vintner has to make is selecting where his grapes will be grown, whether he grows them himself or contracts their growing. A skilled vintner can often produce a drinkable product from a dismal year.
The concept of terroir (or environmental influence on the character of the product) is being applied to much more than just wine. Terroir has been applied to coffee for several decades, though not by that name. Everyone knows that Sumatran coffees tend to be smoky, dark, and rich while Costa Rican coffees are known for being well-balanced and mellow. Chocolatiers are just entering the terroir scene; Ghiradelli and other high-end chocolate producers now offer single region (and sometimes single supplier) chocolates so all the nuances can be savored. Even meat and dairy producers are starting to explore terroir and how it improves their product's marketability.
We will be sampling wines from Oregon, Washington, California, New Zealand, Canada, France, and Australia (if I'm remembering correctly), at least 10 wines. Each of these regions uses a different strategy for growing their grapes. France tends not to irrigate its vineyards, relying on the natural rainfall to provide sufficient moisture to ensure a good crop. Washington's grape growers in the Columbia River Valley irrigate their vineyards to provide ample moisture, but the soils are not as rich (a result of the repeated scourings given by the 14+ incarnations of Glacial Lake Missoula during the Ice Age). Oregon's Willamette Valley soils are rich, but the rains are seasonal, September through May. Each strategy stresses the vines to encourage fruit production over leaf production and limit the total amount of fruit so the flavor will be as concentrated as possible. By comparing the wines produced under these different conditions, we hope to start discerning the terroir of wine.
Next week, I plan to post the results of our tasting.
Monday, April 27, 2009
Lasagna Done Easy
Every so often, Julia and I like to have lasagna. But with only two of us, most lasagna pans make way too much food. Freezing lasagna after it's cooked is can be a real crap shoot. So I make it in smaller pans and freeze it before it's cooked.
I also don't like making a big mess in my kitchen when I can avoid it. I remember years ago having a roommate who decided to make lasagna. He used every pan in the kitchen, left baked-on tomato sauce all over the stove, and spilled sauce in the oven. I spent several hours cleaning because it was my turn to do so. I decided never again!
I have become a real fan of using the cheap, disposable aluminum pans. I don't tie up any of my baking pans in the freezer until I decide to pop it in the oven for dinner and I don't spend hours scrubbing the pans afterward.
In keeping with the not making a big mess, I don't parboil my noodles. It takes too much time and I end up dribbling starchy water between the pot and the baking dish. Plus I think it makes the lasagna too runny. I've heard people complain that no-boil noodles get gummy, but I've never had that problem. I think freezing the lasagna for a week or two prevents gumminess nicely.
I am also a fan of using canned spaghetti sauce as the base for the sauce. The canned stuff has already been cooked and cooked so I don't have to do it. Of course the spicing is incomplete, so I heavily supplement it.
I picked this tip up from Food Network: Buy tomato paste in tubes. Tubes can be recapped, so you don't have to buy 4 oz of tomato paste for just 2 tablespoons. It lasts a long, long time in the refrigerator, so you don't waste too much money on it.
Lasagna -- Meat Version
Lasagna -- Vegetarian Version (not vegan)
Depending on how long the lasagna has been frozen, thawing it for a few hours beforehand is not a bad idea. I froze a lasagna for nearly six months in a bread pan and it was frozen so hard that I baked it for over an hour and a half. Normally, a frozen lasagna is done in 45 minutes.
Since I'm normally cooking for only two people, I like to use the bread size pans. They are nicely deep and just about the right size for two people. I like to enjoy it with freshly baked bread whenever I can.
I also don't like making a big mess in my kitchen when I can avoid it. I remember years ago having a roommate who decided to make lasagna. He used every pan in the kitchen, left baked-on tomato sauce all over the stove, and spilled sauce in the oven. I spent several hours cleaning because it was my turn to do so. I decided never again!
I have become a real fan of using the cheap, disposable aluminum pans. I don't tie up any of my baking pans in the freezer until I decide to pop it in the oven for dinner and I don't spend hours scrubbing the pans afterward.
In keeping with the not making a big mess, I don't parboil my noodles. It takes too much time and I end up dribbling starchy water between the pot and the baking dish. Plus I think it makes the lasagna too runny. I've heard people complain that no-boil noodles get gummy, but I've never had that problem. I think freezing the lasagna for a week or two prevents gumminess nicely.
I am also a fan of using canned spaghetti sauce as the base for the sauce. The canned stuff has already been cooked and cooked so I don't have to do it. Of course the spicing is incomplete, so I heavily supplement it.
I picked this tip up from Food Network: Buy tomato paste in tubes. Tubes can be recapped, so you don't have to buy 4 oz of tomato paste for just 2 tablespoons. It lasts a long, long time in the refrigerator, so you don't waste too much money on it.
Lasagna -- Meat Version
1 box no-boil lasagna noodles
1 jar prepared spaghetti sauce
1 lb low fat ground beef
dried basil
dried oregano
powdered garlic
freshly ground black pepper
1 large onion, diced
1 pound of mushrooms, sliced
1-2 tablespoons of tomato paste
16 oz. ricotta
1 green pepper, diced (optional)
1 egg
1-2 teaspoons of sugar (optional)
1 lb mozzarella
Brown the ground beef and drain grease. Remove ground beef from pan. Saute onion, mushrooms, and optional peppers until onions are translucent.
Add spaghetti sauce and ground beef to onions and mushrooms. Bring to a simmer. Sprinkle dried garlic across the top of the sauce until the top of the sauce is covered with the garlic. Do the same with the basil and oregano. Add a couple of grinds of black pepper. Add tomato paste. Blend thoroughly. Taste the sauce; if it is too sour, add sugar and stir. Remove from heat and set aside.
Mix egg into ricotta cheese. Set aside.
Gather several aluminum pans. Make each lasagna as follows: Splash about a half cup of the sauce in the bottom of the pan. Put a layer of noodles in pan. Cover with ricotta cheese (make no more than 3/4 inch thick). Splash about a quarter of a cup of sauce over cheese. Place a layer of noodles. Repeat until pan is full. Cover top with sauce. Cover sauce with a layer of mozzarella.
Cover each lasagna with aluminum foil and freeze. When it is time to bake the lasagna, preheat oven to 350°F (175°C). Bake until done -- how long will depend on the precise size of the pan.
Lasagna -- Vegetarian Version (not vegan)
1 box no-boil lasagna noodles
1 jar prepared spaghetti sauce
1 tablespoon of olive oil
1-2 squash or zucchini sliced into coins
dried basil
dried oregano
powdered garlic
freshly ground black pepper
1 large onion, diced
1 pound of mushrooms, sliced
1-2 tablespoons of tomato paste
16 oz. ricotta
1 green pepper, diced (optional)
1-2 teaspoons of sugar (optional)
1 egg
1 lb mozzarella
Saute onion, mushrooms, and optional pepper in olive oil until onions are translucent.
Add spaghetti sauce to onions and mushrooms. Bring to a simmer. Sprinkle dried garlic across the top of the sauce until the top of the sauce is covered with the garlic. Do the same with the basil and oregano. Add a couple of grinds of black pepper. Add tomato paste. Blend thoroughly. Taste the sauce; if it is too sour, add sugar and stir. Remove from heat and set aside.
Mix egg into ricotta cheese. Set aside.
Gather several aluminum pans. Make each lasagna as follows: Splash about a half cup of the sauce in the bottom of the pan. Put a layer of noodles in pan. Cover with ricotta cheese (make no more than 3/4 inch thick). Splash about a quarter of a cup of sauce over cheese. Place a layer of noodles. Repeat until pan is full. Cover top with sauce. Cover sauce with a layer of mozzarella.
Cover each lasagna with aluminum foil and freeze. When it is time to bake the lasagna, preheat oven to 350°F (175°C). Bake until done -- how long will depend on the precise size of the pan.
Depending on how long the lasagna has been frozen, thawing it for a few hours beforehand is not a bad idea. I froze a lasagna for nearly six months in a bread pan and it was frozen so hard that I baked it for over an hour and a half. Normally, a frozen lasagna is done in 45 minutes.
Since I'm normally cooking for only two people, I like to use the bread size pans. They are nicely deep and just about the right size for two people. I like to enjoy it with freshly baked bread whenever I can.
Monday, April 20, 2009
Bean Salad
The tenor of all my other posts suggests that I have all the time in the world to cook. I wish! Unfortunately, I work, I volunteer, and I try to have a social life. Sometimes that leaves me wishing I had another 24 hours in the day.
A few weeks ago, I went gaming at a friend's house. Game nights were potluck and I didn't have much time (or energy) to make something wonderful. I looked in my cupboard and realized that I didn't have much besides canned beans. So I decided to make a really quick bean salad.
Bean Salad
This quick and easy bean salad turned out really, really good! The lentils gave the salad a really nice nuttiness that complimented the softness of the beans. I think it took all of half an hour to make.
A few weeks ago, I went gaming at a friend's house. Game nights were potluck and I didn't have much time (or energy) to make something wonderful. I looked in my cupboard and realized that I didn't have much besides canned beans. So I decided to make a really quick bean salad.
Bean Salad
1 15 oz can of cut green beans
1 15 oz can of dark red kidney beans
1 15 oz can of garbanzo beans (chickpeas)
1 15 oz can of black beans
1 cup of lentils (rehydrated and cooked)
1/2 of a large onion, minced
5-6 crimini mushrooms sliced
3 tablespoons of minced garlic
4-5 oz carrots, chopped
4-5 tablespoons capers
1 to 1-1/2 cups of grated romano cheese
1/4 to 1/2 cup of salad dressing (I used Auntie Anne's Sesame and SDrain hittake dressing)
Hydrate and cool lentils.
Roast the garlic for 15-20 minutes in a small ramekin or baking dish.
Drain and rinse the beans.
Mix all ingredients together in a large bowl. Let sit for 15 minutes to half an hour before serving.
This quick and easy bean salad turned out really, really good! The lentils gave the salad a really nice nuttiness that complimented the softness of the beans. I think it took all of half an hour to make.
Monday, April 13, 2009
Pork Chops in Garlic Wine Sauce
When I was growing up, I thought I didn’t like pork. My mother regularly made it, always the same way. She would mix a little salt, ground pepper, and garlic powder in a couple of cups of flour. Then she would dredge the thin pork chops. Finally, she would brown the pork chops in oil, add water, and simmer for half an hour or more. The end product was invariably dry pork chops with a bland brown gravy. So I thought I only liked pork when it was cured. 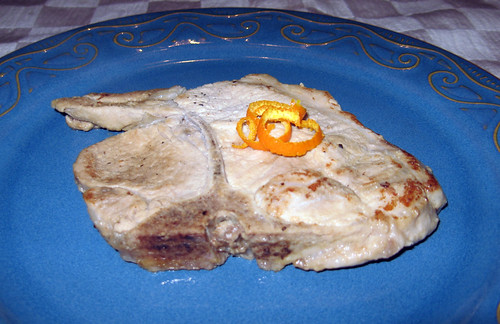
My partner, on the other hand, is a southerner. Or as her sister-in-law calls it: “The People of the Pig.” It was tough on her not eating pork much – either when I wasn’t home for dinner or when she could convince me to cook her pork and myself beef. That ended one night when I got tired of making two dinners and decided to surprise her. I realized that I could deal with the meat’s dryness if I moist-cooked it. So I quickly seared the meat, added water, and added salt and garlic. Something was missing, so I threw in some peppercorns (which I hate, but my nose said it needed). Something was still missing, so I dribbled in some rum. And I loved every bite of it!
So I went on a crusade to figure out how to make yummy pork. And I've been succeeding!
Pork Chops in Garlic Wine Sauce
3 tablespoons of chopped garlic
1 cup of Chardonnay
2 cups of water
1 large pinch of coarse-ground kosher salt
Several grinds of black pepper
1 teaspoon of orange zest
2 tablespoons canola oil
2 large pork steaks (I used pork sirloin steaks)
Pulse the garlic to turn it into a paste. Add wine, salt, pepper, and garlic. Add pork steaks and marinade for an hour.
Heat oil in skillet on high. Remove pork steaks from marinade (reserve marinade) and pat dry. Sear steaks until brown on both sides. Add 1 cup of marinade and simmer for 30 minutes.
The pork was really tender. The pork is well-flavored with the marinade and very, very moist. The orange zest really brings out the native sweetness of the pork and brightens the flavor wonderfully. This goes really well with rice pilaf and freshly steamed broccoli.
Monday, April 6, 2009
Shortbread - oh, yeah!
I make an amazing shortbread, even if I say so myself. Actually, someone has nicknamed my shortbread as “crack” because she can’t leave it alone. If how little of it returning home after a get-together is any indication, she’s right.
Basic Shortbread Recipe
1 lb of unsalted butter
1-1/4 cup of confectioner’s sugar (or caster’s sugar) – do not use granulated
4 cups of flour
¼ teaspoon of salt (optional – I often leave it out)
Cream together the sugar and butter until the butter is light and airy. Do not over-cream. Mix in the flour. I usually use a stand mixer, so I add it in ½ cup increments to keep my kitchen from being flour-coated.
Put in to 9-inch cake pans or a 13-inch baking dish. I’ve been using an 8-inch and 10-inch springform pan. Bake at 325° for 25-30 minutes. The edges should just be beginning to turn brown. I often decorate with colored sugar or decorator’s gel before I bake it.
I was researching the history of shortbread, trying to figure out the origins of modern shortbread. I came across several recipes that had a variety of spices in the mix, so I decided to experiment.
After making my base shortbread recipe, I divided the batch into four pieces.
- I left this piece plain as a comparison piece.
- I added ½ teaspoon of freshly grated cinnamon, ½ teaspoon of freshly grated nutmeg, and ½ teaspoon of coriander (I would have used fresh, but only had powdered). Just a note about grating cinnamon — don’t grate along the edge, grate along the side.
- I added ¼ teaspoon of cardamom, gently crushed.
- I added ½ teaspoon of crushed, dried rosehips.
I decorated it and baked it as usual for a get-together of people who have never had my shortbread. Everyone liked all the variants of it, but especially the cinnamon/nutmeg/coriander.
- The plain shortbread is a wonderful creamy, sweet treat. I’ve often been tempted to add fresh vanilla and see what that does.
- The cinnamon/nutmeg/coriander version was nicely spiced with a warm earthy flavor. I thought it was very comforting and Christmas-y, but that was really just me. I really ought to try it with each of the spices separately and with aniseed.
- The cardamom gave a nice, aromatic, lemon-like tone to the shortbread. I should have crushed it up a bit finer and used a half teaspoon. The cardamom provided a nice, sweet refreshment to the mouth. I’d like to serve this between courses of a meal as a palate cleanser. After trying this, I am actually considering a trial using the zest of lemons, lime, and oranges.
- The rosehips didn’t quite do what I expected. Sometimes the rosehips were a little hard and chewy; I should have crushed it up bit finer. I liked the citrus notes, but the floral tones were more subtle than I expected. This might be remedied by using more rosehips (like 1 teaspoon), but I also might try it with my rosehip butter. The honey will make it a little challenging but the flavor should be amazing.
Subscribe to:
Posts (Atom)