Monday, October 26, 2009

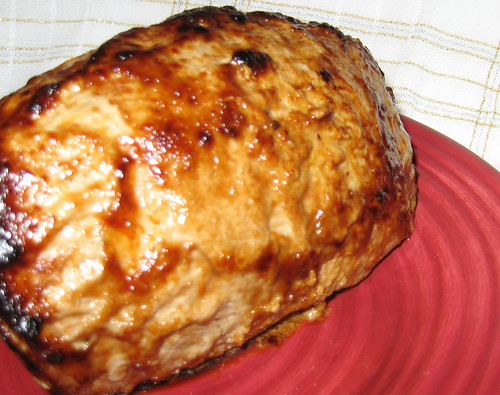
Cornish Game Hen

One of our local grocery chains (local to the area) every two weeks or so has a themed "13 Hour Sale." Some weeks the theme is baking supplies; others it is wine and cheese; and yet others it is candy. A little while ago, the chain had a 13-Hour Meat Sale.

For the most part, I buy meats as we plan to eat them. Not as economical as it might be, but the meat is fresh, not frozen. I didn't buy much meat this year as the sales weren't as good as they've been in the past, but I did pick up a few Cornish game hens for two dollars each. They were already frozen, so I didn't have to worry about reducing their quality by freezing them.

Not long after the sale, the weather turned colder. When the weather gets cold, I turn on my oven. So I roasted a Cornish game hen for dinner.

As most of you know, roasting meat is basically a balancing game of trying to get the internal temperature to a certain point before the meat dries out. The easiest way to do this is to roast at a relatively high temperature. The standard 350°F (176°C) oven that most people leave their ovens set at just doesn't cut it. The meat gets dry, especially for birds, while the bottom gets greasy. Not terribly appetizing.

The solution is simple: turn that oven UP! Roasting at anything less than 425°F (218°C) is not going to give great results, whether you are cooking a hunk of beef, a turkey, or a meatloaf.

I like to cook my poultry at about 450°F (232°C). The skin of the bird gets nice and crispy and the interior cooks faster than the moisture can evaporate. Yum!

Anyway, back to my Cornish game hen:

Cornish Game Hen
1 Cornish game hen
1/4 large onion, chopped coarsely
2 tablespoons garlic, chopped finely
1 teaspoon of one of the following fresh green herbs chopped finely: sage, rosemary, thyme, tarragon (2 teaspoons of the dried version will work)
1-1/2 teaspoons salt
2 tablespoons butter

Preheat the oven to 450°F (232°C).

Melt the butter.

Clean the interior of the cavity of the bird, removing any giblet packets and any stringy material. Spread the salt along the interior of the cavity. Put the chopped onion, garlic and green herb. Place Cornish game hen on its back in a roasting pan.

Drizzle butter over the skin of the bird.

Roast until the internal temperature reaches 180°F (82°C). Let rest for 10 minutes, remove the stuffing (discard the stuffing), then serve.

Serves 2


I can go either way regarding buttering the skin of the bird. If the bird is particularly thin-skinned, then it really does help keep the breast meat moist (as does roasting the bird on its breast, but then it doesn't look nearly as pretty). I am more likely to butter the skin if I melt the butter, simmer some herbs in it, then strain before applying to the bird. If you do butter the skin, it is more important to get the roasting temperature up so the skin crisps nicely.

If you don't want an herb-y chicken, use zest from and orange or lemon, apple, peach, or nectarine.

The stuffing in the cavity of the bird perfumes the meat wonderfully and leaves no bitterness behind.

Monday, October 19, 2009

Mushrooms and Leeks

I like mushrooms and I like leeks. So the recipe Fungys in Forme of Cury that combines the two is especially appealing. Especially since it contains my favorite spice blend of all time: poudre forte (strong powder). Since I don't rely on a set poudre forte recipe, that meant I could play!

I will warn you up front that the measurements of the spices is only general as I blended these by smell not by measurement. I was looking for a spicing that would help bring out the piquancy of the leeks and support the savoriness of the mushrooms. Also, this recipe can be made up with more or less cooking broth, depending on if you want something like a soup or something more like a side dish.

Mushrooms and Leeks
1 lb crimini mushrooms (portabellos will work too)
1 lb leeks
1 tablespoon (more or less) ginger powder
1/2 tablespoon (more or less) garlic powder
1 teaspoon (more or less) cinnamon powder
1/2 teaspoon (more or less) coriander powder
1/2 teaspoon (more or less) nutmeg powder
1/4 teaspoon (more or less) mace powder
1/4 teaspoon (more or less) cumin powder
1/2 teaspoon (more or less) black pepper
1 teaspoon (more or less) salt
1-2 cups (more or less) chicken broth

Thinly slice the leeks across the grain into coins, between 1/16 and 1/8 of an inch thick. Hint: Slice the leeks then clean them to get the most grit/sand out of them. As you reach the dark green of the outer leaves, remove them and continue slicing the lighter/brighter green of the inner leaves.

Thickly slice the mushrooms, between 1/8 and 1/4 of an inch.

Place leeks and mushrooms in a pan with spices and add broth. If the dish is a side dish, fill with broth to about 2/3 the height of the mushrooms and leeks (you will bet more fluid from the mushrooms as they cook); if the dish will be a soup, make sure the mushrooms and leeks are completely covered with fluid.

Simmer until the mushrooms and leeks are cooked. You want them to cook for the same length of time to allow the flavors to marry and for the mushrooms to become the dominant flavor in the broth.


I liked how the ginger and the garlic helped enhance the sharpness of the leeks and brightened the dish. The cinnamon, cumin, coriander, mace, and nutmeg balanced the sharpness and supported the meatiness of the mushrooms.

This dish is a wonderful low-fat dish. If you used vegetable broth (preferably not tomato-based) to make a vegetarian version, few carnivores would miss the lack of meat. I made three quarts of this for potluck of 150 people and it was gone by the time 3/4 of the people had gotten through the line!

Serve with bread for a satisfying soup.

Monday, October 12, 2009

Ribs, succulent ribs!

One of my local grocers frequently has pork ribs on sale: spare ribs, baby back ribs, or country ribs. So I've become quite fond of trying to barbecue them.

I don't mean drenching them in sauce and grilling them at a high heat until they are done and dry. I mean long, slow cooking at relatively low temperatures for hours until they are tender and juicy and just everything ribs should be.

Most grills produce temperatures that are too high to do this, even at the lowest settings that still produce flame. But my oven at home works beautifully -- I can set it as low as 170°F (77°C) if I want. I can cook as low and slow as I want. If I remember to give the meat enough time to cook.

Pork Ribs
1 rack of pork spare ribs
1 tablespoon salt
Dry Rub
3 tablespoons powdered garlic
1 teaspoon freshly ground pepper
1 teaspoon ground cinnamon
1 teaspoon ground ginger
1-1/2 teaspoons ground mustard
1 tablespoon ground cumin
1 teaspoon ground coriander
1/2 teaspoon ground tumeric
1 teaspoon smoked paprika
1/2 teaspoon cayenne pepper
Sauce
1 cup barbeque sauce -- I use Jim Bean No 7
1/4 cup soy sauce
1/4 cup Worchestershire sauce
1 teaspoon lemon juice
2 teaspoons tomato paste
1 cup of water (1/2 cup of whiskey can be substituted for 1/2 cup of the water)

Rub the spare ribs with the salt on both sides. Let sit while you mix the dry rub. Once the dry rub is done, rub both sides of the ribs with 1/2 of the dry rub mixture. Cover loosely with plastic wrap and let sit in the refrigerator for at least two hours.

Heat the oven to 250°F (121°C). You can set the oven as low as 200°F but it will take much, much longer to cook. Remove the plastic wrap from the ribs and place in the oven on a baking sheet. You may want to set the ribs on a rack on the baking sheet to let the meat drain more effectively.

Flip over every two hours.

Mix the ingredients for the sauce with the remaining dry rub. After the ribs have been flipped for the second time, spoon about 1/4 of the sauce over the top of the ribs. Each time the ribs are flipped, spoon about 1/4 of the sauce over the new top surface.

Continue cooking until done, between 7 and 8 hours.


I cook the ribs for at least a half hour after I've put the last of the sauce on so the newest basting has time to thicken.

I will admit that I cheat using the commercial barbecue sauce as a base for my sauce. Mostly that's because I don't want to be chained to the stove cooking down the sauce for myself. I want to be able to focus on doing other things: sewing, painting, writing this blog...

The results of this slow roasting are wonderful. The sauce is nice and thick and not overly messy. It is also incredibly rich with a wonderful balance of tangy, sweet, and spicy. I don't like overly tomato-y barbecue sauces; I only want to use it as a jumping off point for my other flavors. Thinning the barbecue sauce with the soy sauce and Worchestershire sauce (and the whiskey) adds more savoriness to the sauce while the garlic, ginger, and cayenne tantalize the nose and tongue.

Monday, October 5, 2009

Stuffing

With Thanksgiving coming up, I thought that talking about stuffings for poultry would be a nice idea. See, I'm not overly into bread stuffings. I like stuffing to help flavor my birds.

Last week, I stuffed a duck with rosemary and nectarine. The fruit helped keep the duck moist and perfumed the meat with rosemary.

I've also roasted chickens stuffed with onion, rosemary, sage, and tarragon. Other stuffings I've used are:
  • Parsley and onion

  • Leeks

  • Onions, mushrooms, sage

  • Whole sprigs of rosemary, sage, and thyme

  • Apples, cinnamon, and nutmeg

  • Apricots, and sage

  • Grapes, currants, and rosemary


The keys to using this type of stuffing are to pack the cavity loosely and to not try to fill the cavity. Some air flow within the bird is desirable and helps with the perfuming of the meat. Fruits help the meat stay moist and the acids help cut the fat (especially for game birds like ducks and geese).

Make sure you take the temperature of the stuffing as well as the bird to ensure it is done. Rest the bird, then remove the stuffing; generally, you won't want to eat it.

This Thanksgiving, have fun with non-traditional stuffing. They can really add flavor to your bird without adding the calories (and carbs) of a traditional stuffing.

Monday, September 28, 2009

Duck, Duck, Nom

I love cooking game meats. I grew up in a hunting family where what we brought in was a significant portion of the meat we ate: venison, goose, squirrel, rabbit, grouse, and duck. Now that I no longer live with my parents and no longer hunt (due to living in a city and not tolerating cold at all), I don't get game nearly as often. But, if I'm willing to pay a bit of cash, I can often get farm-raised game in a local grocery.

This week, I had offered to provide a meat entreé for a dinner party hosted by a friend. I wanted to make a special dish that people would remember and that they couldn't get very often, so I chose to roast a duck with rosemary and nectarines.

Duck with Rosemary and Nectarine
1 2-3 pound ducking, skin on (if the duck comes skinless, lay strips of bacon along the breast to keep it from drying out)
1 nectarine
2-3 stalks rosemary
1/2 - 1 teaspoon salt
2 tablespoons butter, melted

Preheat oven to 350°F (175°C).

Chop the rosemary finely.
WARNING: Do not chop fingers while chopping rosemary. If finger is chopped while chopping rosemary, seek medical attention if necessary. Once finger is appropriately treated and bandaged, discard rosemary and start with fresh rosemary, knife, and cutting board. Or avoid potential of above by using food processor ;)


Peel nectarine and remove pit. Slice or chop nectarine into large pieces.

Unwrap duck and remove any giblets, neck, or other material remaining in body cavity. Rinse out with cold water and drain briefly.

Spread salt throughout the cavity of the duck and rub gently. Insert rosemary and nectarine into cavity.

Spread a little of the butter in a roasting dish and place bird in dish. Rub remaining butter on the skin of the bird (if bird is skinless, skip this and lay bacon on bird instead).

Place duck in oven and cook until internal temperature has reached 170°F (77°C). Remove duck (remove bacon now) and let rest.


The duck can be served hot or cold.

I served the duck cold as I made it the day before the party. The duck remained moist and flavorful, perfumed with the rosemary. The gaminess of the duck was offset by the nectarine, though apricots, apples, or peaches will work as well.

The duck meat was very, very moist and tender. In fact, the carving the duck was an adventure as it wanted to fall away from the bone.

Monday, September 21, 2009

Roast Beef in a Garlic Smear

I love to roast meats and veggies, especially as the weather grows cooler. Not that the weather is actually cool yet, but the temperatures have gone down enough from summer that I feel like I can turn the oven on again.

The local grocery chain had eye of round roasts on sale. The interior doesn't have a lot of fat, so the trick is to keep the roast from drying out. I opted for a relatively quick cooking time and a coated exterior to keep the juices in.

The coating didn't really form a crust and it wasn't a glaze, so I wasn't sure what to call it. I decided to settle on a smear.


Roast Beef in a Garlic Smear
1/3 cup olive oil
3 tablespoons chopped garlic
1 - 2 teaspoons balsamic vinegar
1/2 teaspoon salt
2 - 2-1/2 lb beef roast

Puree the olive oil, garlic, vinegar, and salt together.

Trim any excess fat from the outer layer of the meat.

Spread a couple of teaspoons of olive oil on the bottom of the roasting pan. This will keep the roast and smear from sticking to the pan.

Coat the roast with the puree and place in roasting pan. Roast at 450°F (232°C) until the internal temperature reaches the desired level of doneness. I cooked mine until 140°F (60°C), which took about two hours or so.


As garlic is roasted, it loses a lot of its pungency and increases its umami and sweet tones. The oil kept the smear from getting crusty, but also helped hold in the juiciness of the meat. My favorite part of the roast was the edges next to the carmelized crust. This would be a surprise to anyone who knows me because I tend to prefer my beef on the blue end of rare -- which was not how this edges of this roast were. But the meat was so sweet and succulent that I almost couldn't get enough of it.

I served the roast with baked mashed potatoes with horseradish and steamed broccoli.

Monday, September 14, 2009

Citrus Balsamic Vinaigrette

Last week, I made an interesting sauce for over steamed broccoli and carrots. The sauce was simple: balsamic vinegar and orange zest. All weekend long, all I could think of was how good that sauce was and how awesome it would be over fresh greens and some fruit. So that's what I did!

I will warn you now that this dressing isn't for everyone. My partner isn't too fond of it; she finds balsamic vinegar too strongly flavored.


Citrus Balsamic Vinaigrette
1 cup dark balsamic vinegar
zest of 2 oranges
1/3 cup extra virgin olive oil

Soak zest in vinegar for about an hour. Strain.

Whisk in oil slowly until blended.


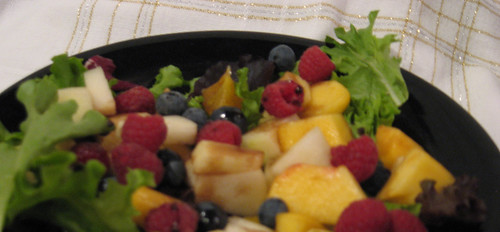
I served it over fresh greens with pieces of apples, oranges, pears, and nectarines and several blueberries and raspberries. The dressing was wonderfully bright and tangy and set off the sweetness of the fruit nicely while providing a nice little savory tone to the salad.